Python Code Generation
This example demonstrates how to generate Python code from a statechart. We will use a simple light switch example and focus on the generator model.
Generator Model
In order to generate code we need to specify which code generator to use and into which folder to generate. For this, we need to create a so-called generator model. To do so,
- Select the models folder in the Project Explorer
- Right-click and choose New -> Code generator model
- Follow the wizard to select the Python code generator and the state machine for which you want to generate Python code
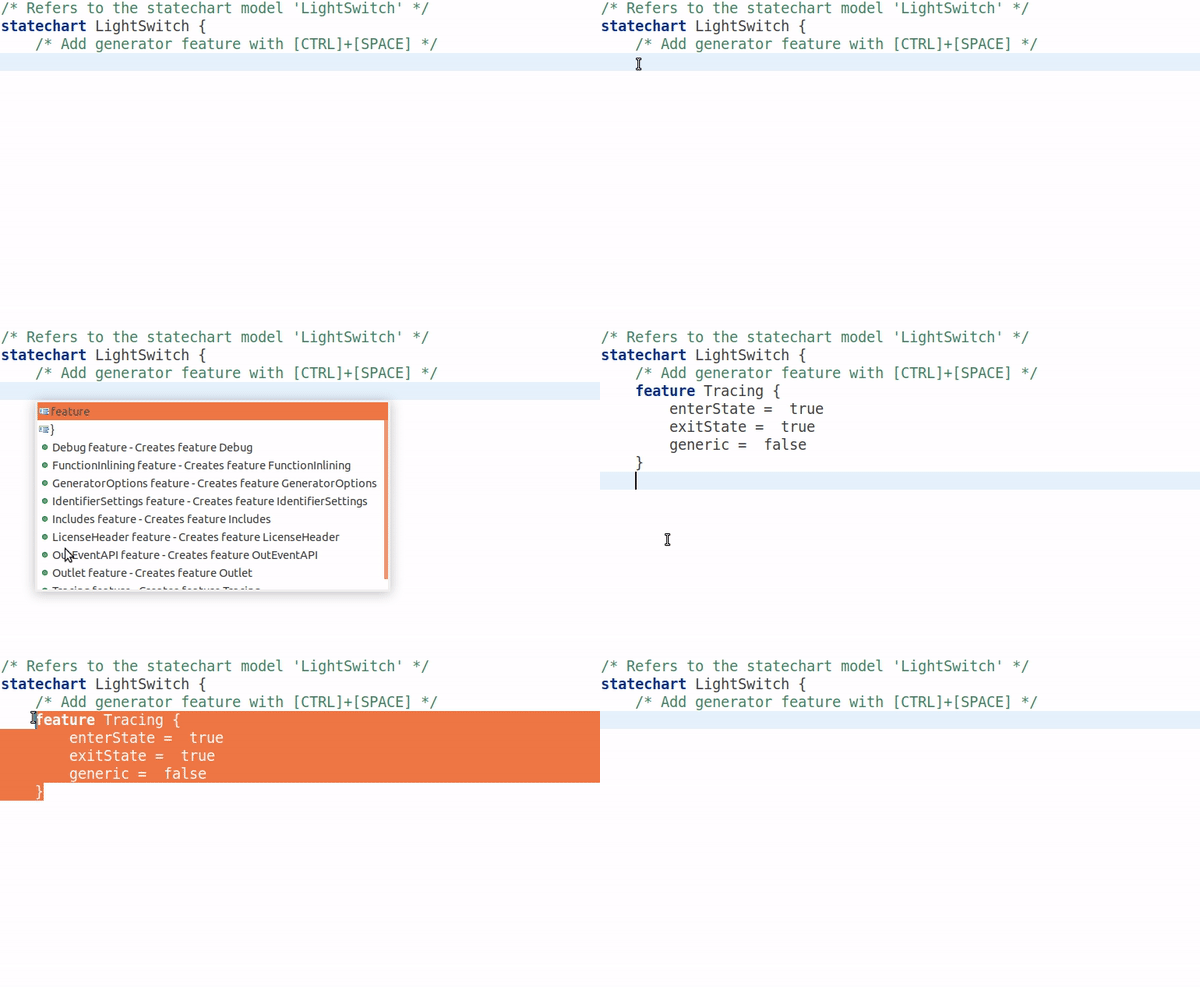
The new generator model will look similar to this one:
/* Defines which code generator to use */
GeneratorModel for create::python {
	/* Refers to the statechart model 'LightSwitch' */
	statechart LightSwitch {
		/* Specify the target location for the generated artifacts. */
		feature Outlet {
			targetProject = "itemis.create.examples.codegen.python"
			targetFolder = "src"
		}
		/* Generate a default timer service implementation */
		feature GeneralFeatures {
			DefaultTimer = true
		}
	}
}
The generator model defines where the code should be generated into, and enables the generation of a default timer service. Besides setting up the target location, the generator model allows you to adjust several aspects of the generated code like naming, license comments or function inlining. Press [CTRL]+[SPACE] to get a list of available features. For more information, please refer to our documentation.
Invoking Code Generation
Code generation is usually invoked each time the statechart model is saved. This behavior can be disabled by unchecking the option Project -> Build Automatically. You can always manually invoke the code generation with Generate Code Artifacts in the context menu of the generator model.
The Example Application
As an example application we will use the light switch example with brightness adjustment from the Basic Tutorial.
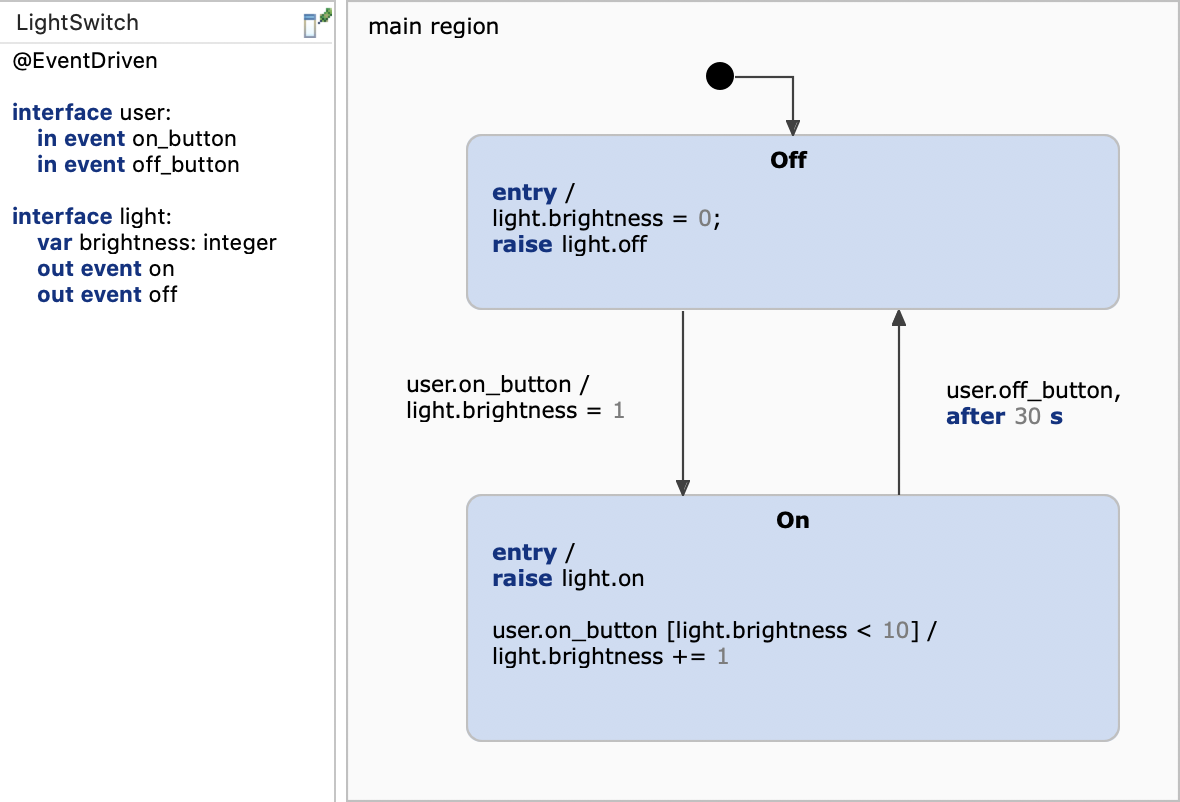
Our application is a simple interactive console with which the user can switch the light on or off. The complete application code is implemented in main.py:
from light_switch import LightSwitch
from yakindu.rx import Observer
from yakindu.timer.timer_service import TimerService

class Main:

    # Observer with callback for the light.on event
    class LightOnObserver(Observer):
        def next(self):
            print("Light is on.")

    # Observer with callback for the light.off event
    class LightOffObserver(Observer):
        def next(self):
            print("Light is off.")


    def __init__(self):
        # Instantiates the state machine
        self.sm = LightSwitch()
        # Instantiates observer for the out events
        self.lightOnObserver = self.LightOnObserver()
        self.lightOffObserver = self.LightOffObserver()

    def setup(self):
        # Set the timer service
        self.sm.timer_service = TimerService()
        # Subscribes observers to the state machine's observables
        self.sm.light.on_observable.subscribe(self.lightOnObserver)
        self.sm.light.off_observable.subscribe(self.lightOffObserver)
        # Enters the state machine; from this point on the state machine is ready to react on incoming event
        self.sm.enter()

    def run(self):
        print("Type 'On' or 'Off' to switch the light on or off.")
        while not self.sm.is_final() :
            self.input = input()
            if self.input == 'On':
                # Raises the On event in the state machine which causes the corresponding transition to be taken
                self.sm.user.raise_on_button()
                self.print_status()
            elif self.input == 'Off':
                # Raises the Off event in the state machine
                self.sm.user.raise_off_button()
                self.print_status()
        self.shutdown()

    def shutdown(self):
        self.sm.exit()

    def print_status(self):
        # Gets the value of the brightness variable
        brightness = self.sm.light.brightness
        print("Brightness: ", brightness, ".")


if __name__ == '__main__':
    m = Main()
    m.setup()
    m.run()
The most important parts are commented in the main.py file. These are the bullet points:
- Instantiate the state machine and the observers
- Set the timer service
- Subscribe observers to react on outgoing events
- Enter the state machine; from this point on the state machine is ready to react on incoming event
- Raise the input events
user.on_buttonanduser.off_button
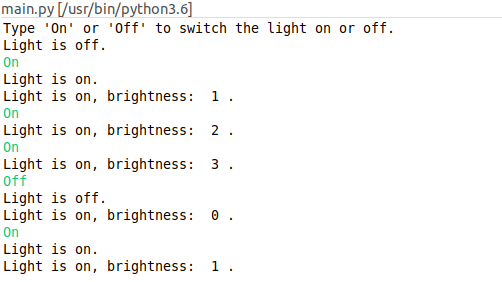
You can run the application with Run As -> Python Run on the main.py file. A console should open and ask you for input like in the screenshot below.
Get this example
The complete project — statechart models, sources and build files — lives in the itemis CREATE examples repository. Inside itemis CREATE for Eclipse you can import it directly with the example wizard.