itemis SECURE 24.3
Overview
With itemis SECURE 24.3, we are delighted to announce the newest release of our TARA tool, bringing a range of enhancements to elevate your experience with itemis SECURE. This update introduces significant improvements designed to streamline workflows, strengthen product security, and align with common threat modeling techniques. By incorporating user feedback and industry best practices, this release delivers powerful new features and enhancements to simplify complex processes and improve overall functionality.
This release introduces a new approach to assessing your Assets and identifying Threat Scenarios through the concept of Trust Boundaries. By leveraging a new Trust Model in the Method Configuration, you can now define Trust Zones for your Component hierarchy and derive criticality ratings for your Data Flows. This enhancement integrates proven processes from the software development industry into itemis SECURE, providing a more robust and structured assessment framework.
In this release, we are rolling out a revamped Function Assignment chunk, designed to enhance user experience, improve visual integration with the tool, and expand its overall functionality. To further support your efforts, we've expanded the use of our Support Ticketing System, allowing you to submit tickets directly and efficiently monitor the status of ongoing support requests. Alongside these updates, we've made numerous other improvements to streamline your TARA workflows.
Our commitment to continuous improvement remains steadfast, and we look forward to delivering more updates in future releases. Thank you for your ongoing support as we strive to make itemis SECURE the ultimate solution for your TARA process needs.
Trust Zones and Trust Boundaries
In this release, we present Trust Zones and Trust Boundaries. This new feature allows you to leverage distinct Trust Zones in your item definition and evaluate Trust Levels per component. Additionally, it enables the assessment of Data Flow criticality and the identification of new threat scenarios, if necessary. All introduced entities have full XSAM-compatibility as well.
The newly introduced Trust Analysis is based on common threat modeling techniques from software development which are becoming relevant to the automotive industry as the workflows and artifacts of both industries blend in more and more.
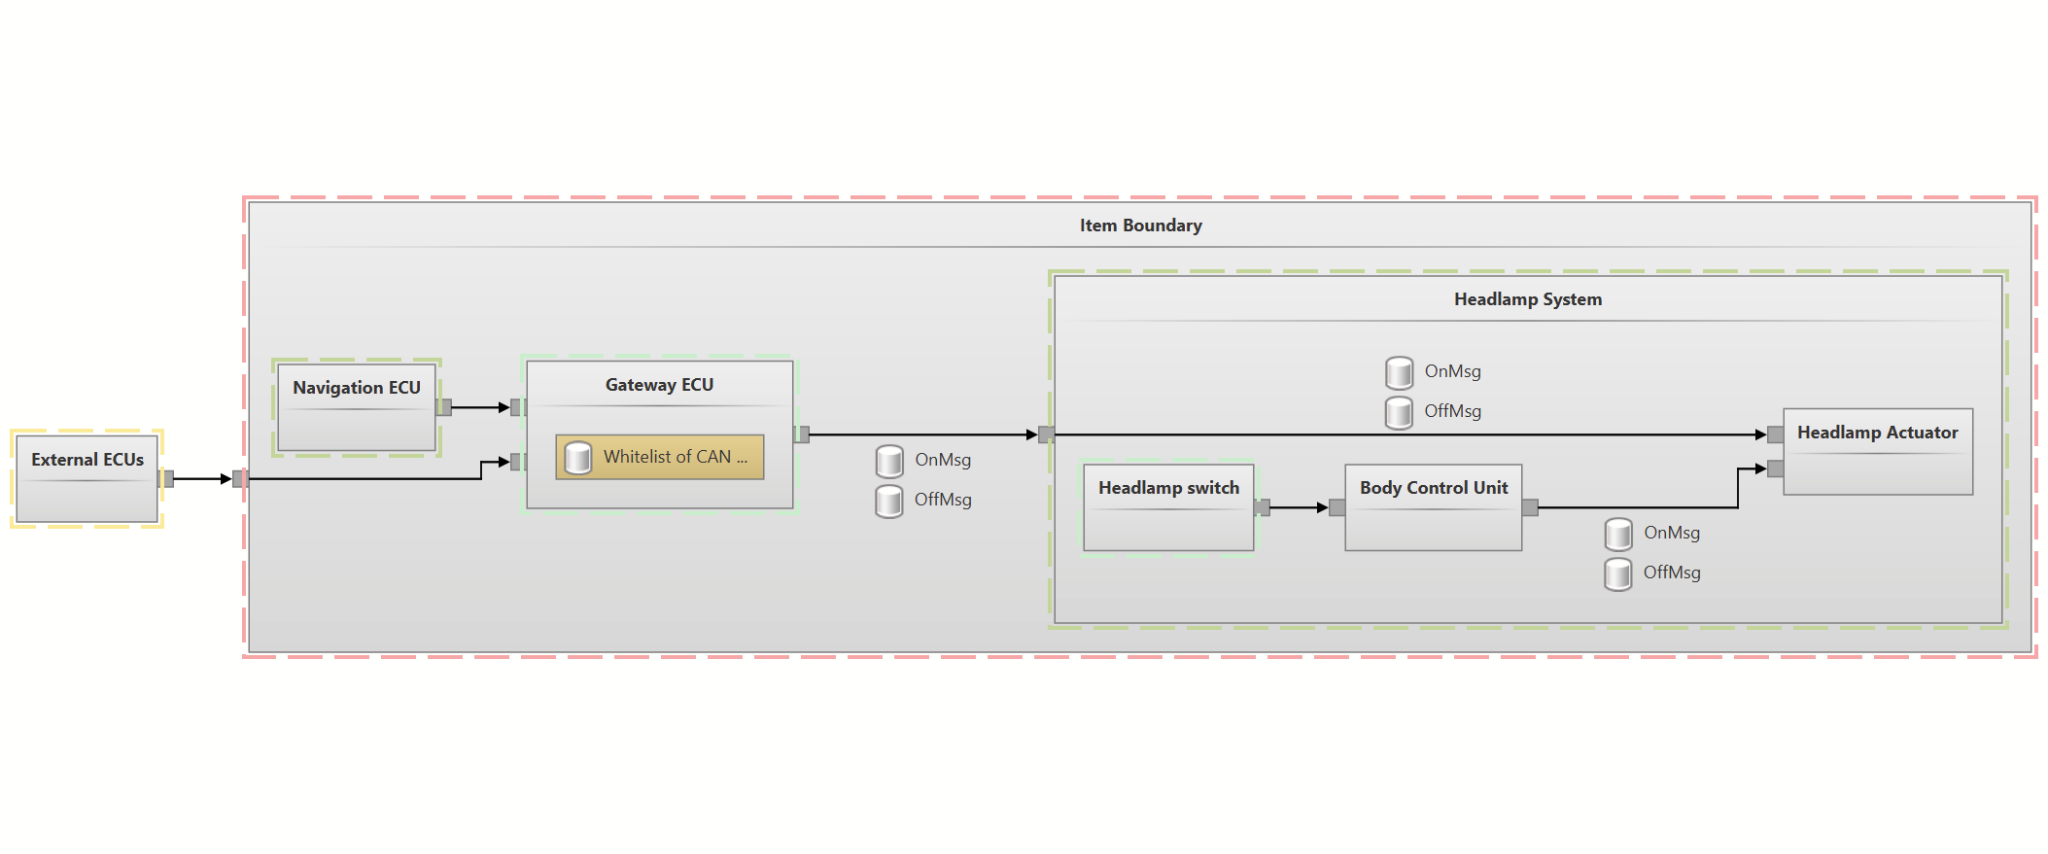
Enriched System Diagram of the ISO Example, showing how Trust Zones and Components build up a common semantic hierarchy (at this point not graphically present in itemis SECURE).
In order to use the Trust Analysis feature you have to configure Trust Levels and Trust Boundary Categories as part of your Method Configuration. We have added a Trust Model for that purpose. It includes two sections:
- Trust Levels
- Trust Boundary Categories
There is also a new chunk within the Item Definition:
- Trust Zones
Components and Data Flows have been expanded to allow them to reference the corresponding Trust Zones.
We will describe those elements in more detail in the following chapters. The Trust Analysis of Assets is an optional feature and process improvement. If you have no need for that feature, you may jump to the next chapters right away.
Trust Model
Within the Trust Model — a new member of the Method Configuration — you can define Trust Levels, which can be used to rate Trust Zones. New projects as well as the included examples feature some exemplary definitions to get you started.
A Trust Level includes:
-
name
-
color code for easy visual distinction
-
numerical value to mark significance
-
description
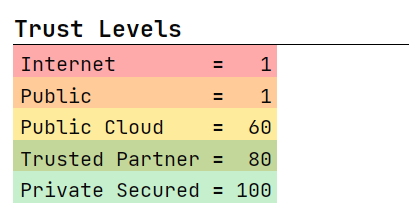
We follow a fixed approach for which higher trust level ratings indicate a higher trustworthiness.
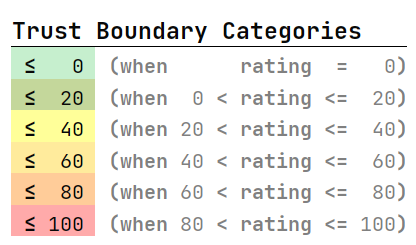
In addition to the Trust Levels, you can specify Trust Boundary Categories in the Method Configuration. These serve as a way to customize the used colors that are applied to Trust Boundary ratings. These boundaries are essential for identifying and visualizing trust level discrepancies, especially when data is transferred between components with varying trust levels. For example, when data flows from a high-trust component to a lower-trust one, it can introduce potential security risks (e.g. violating confidentiality).
A Trust Boundary Category includes:
-
A color for easy visual distinction
-
A threshold value to mark significance
Trust Zones
Using the previously defined Trust Model with its Trust Levels within your Method Configuration, you can create your own hierarchy of Trust Zones as part of the Item Definition. These represent areas of a certain Trust Level. The Trust Zones hierarchy is managed as a separate element, which can then be assigned to individual components as needed.

Each Trust Zone includes:
- Name
- Title
- Assigned Trust Level
- Sub-Zones
Nested Trust Zones must maintain a hierarchy where a sub-zone has an equal or higher Trust Level than the zone containing it. If a sub-zone has a lower Trust Level than its parent, a warning will appear, as this structure would undermine the integrity of the parent zone's trust level by introducing less trusted elements within a higher-trust area.
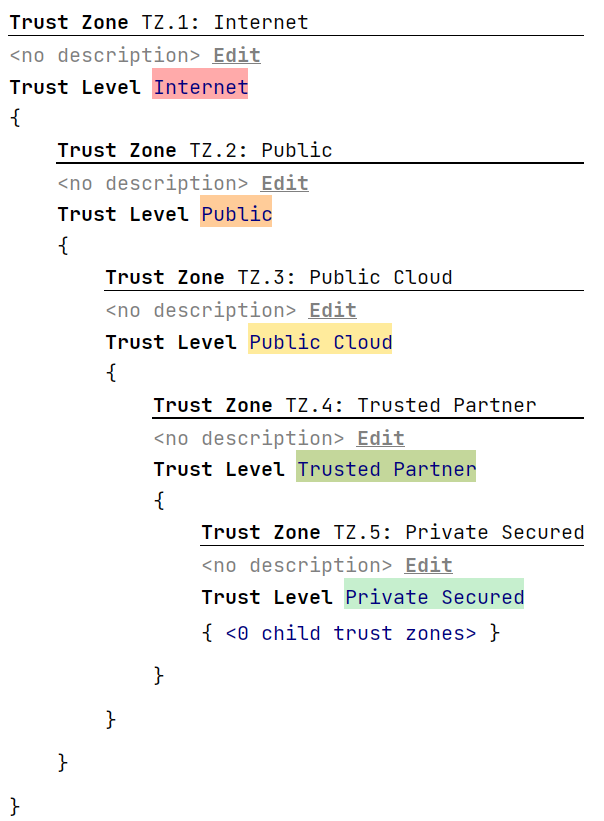
To simplify the process of building a Trust Zone hierarchy, we provide an "intention" on empty Trust Zone Chunks. Once you've completed your Trust Model, go to the Trust Zone Chunk (or create one if your project doesn't have one), select the chunk title, open the intention menu (ALT+ENTER), and choose Populate Trust Zone Chunk from available Trust Levels. This will automatically create a nested hierarchy based on your Trust Levels.
The generated hierarchy will respect the Trust Level ratings: even if the levels aren't sorted by rating, it will arrange them from the lowest-rated Trust Level as the root Trust Zone, progressing upwards to the highest-rated, "innermost" Trust Zone.
You can adjust the hierarchy afterward if it doesn't align with your vision, but this approach gives you a pre-built structure to refine rather than starting from scratch.

Components
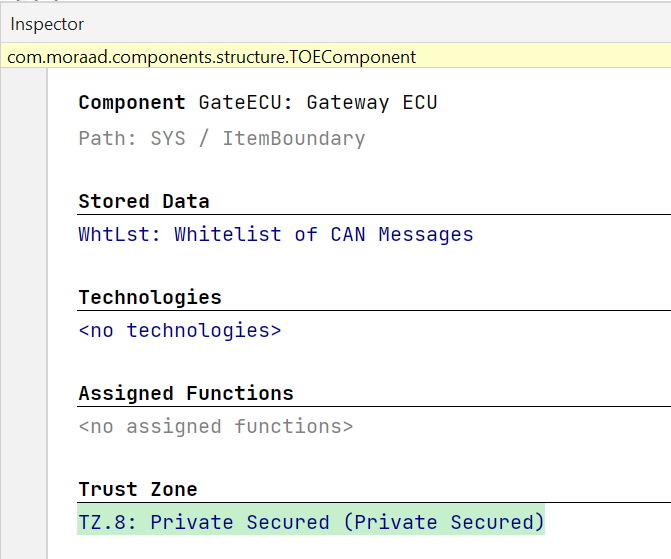
Once you've defined Trust Zones, you can link existing Components to the appropriate Trust Zone. To do this, Components now have a new field in the inspector where you can assign a Trust Zone. If a Component doesn't specify its own Trust Zone, it will inherit the Trust Zone and Trust Level from its parent.
In line with the hierarchy of Components and Trust Zones, a sub-component can only reference sub-zones within the Trust Zone of its parent component. If it tries to link to a non-permissible zone, a warning will appear.
Data Flows
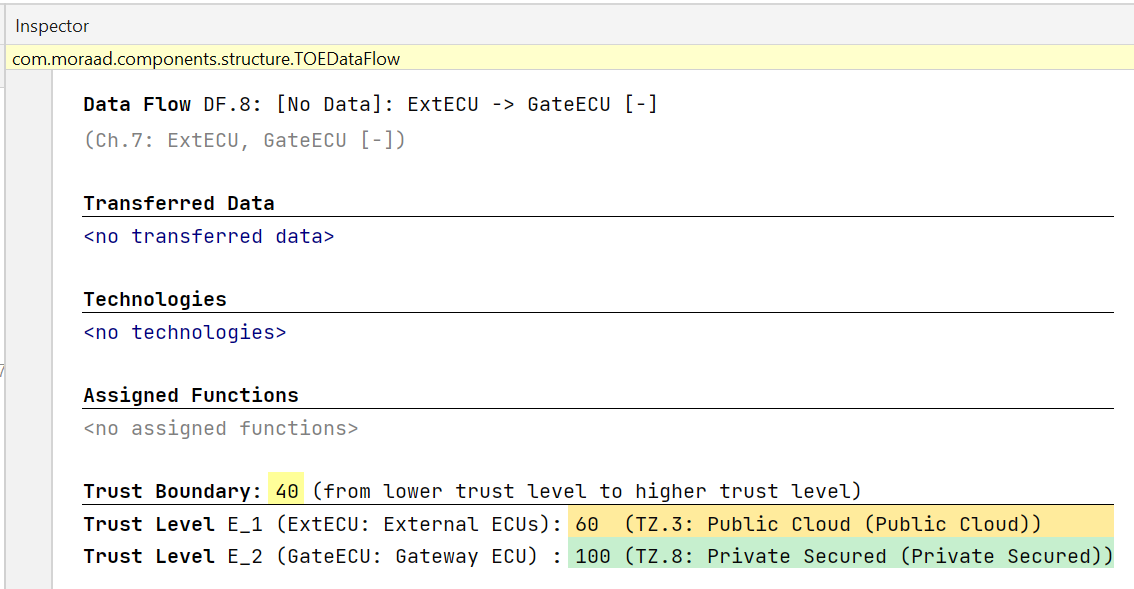
When both endpoints of a Data Flow belong to some Trust Zone, the Data Flow will display a "criticality" rating in the inspector. This Trust Boundary Rating is calculated as the difference in Trust Levels between the connected components. A lower Trust Boundary means the connected components have similar Trust Levels, while a higher Trust Boundary shows a significant difference between them. The Trust Levels of each endpoint are also displayed for context.
To help you quickly interpret the Trust Boundary Rating, color coding is applied based on criticality levels. This color information is drawn from the Trust Model's Trust Boundary Categories. If no categories are defined, the calculation works as usual, just without color highlights. Each Data Flow is colored according to the Trust Boundary Category with the highest upper limit that matches its rating.
If a Data Flow links an assessed component with an unassessed one, the inspector will flag the unassessed endpoint to make it easier to complete the assessment incrementally.
Reports
To make all Trust-related data easily exportable in a readable format, we've added new report items and expanded existing ones.
- Trust Levels Table: A new report item similar to other Levels Tables (IL, AFL, RL) in the Method Configuration. It lists all defined Trust Levels with their values and colors.
- Trust Zones Table: Similar to the Components Table, this new item lists all defined Trust Zones, showing details like the associated Trust Level and any sub-zones.
- Components Table: This existing item now includes each component's declared or inherited Trust Zone.
- Data Flows Table: The existing Data Flows Table now shows the Trust Boundary rating for each Data Flow where it can be calculated, along with the Trust Zones of the endpoints. This makes it easier to verify the displayed Trust Boundary information.
Interaction Assistant and Trust Boundaries
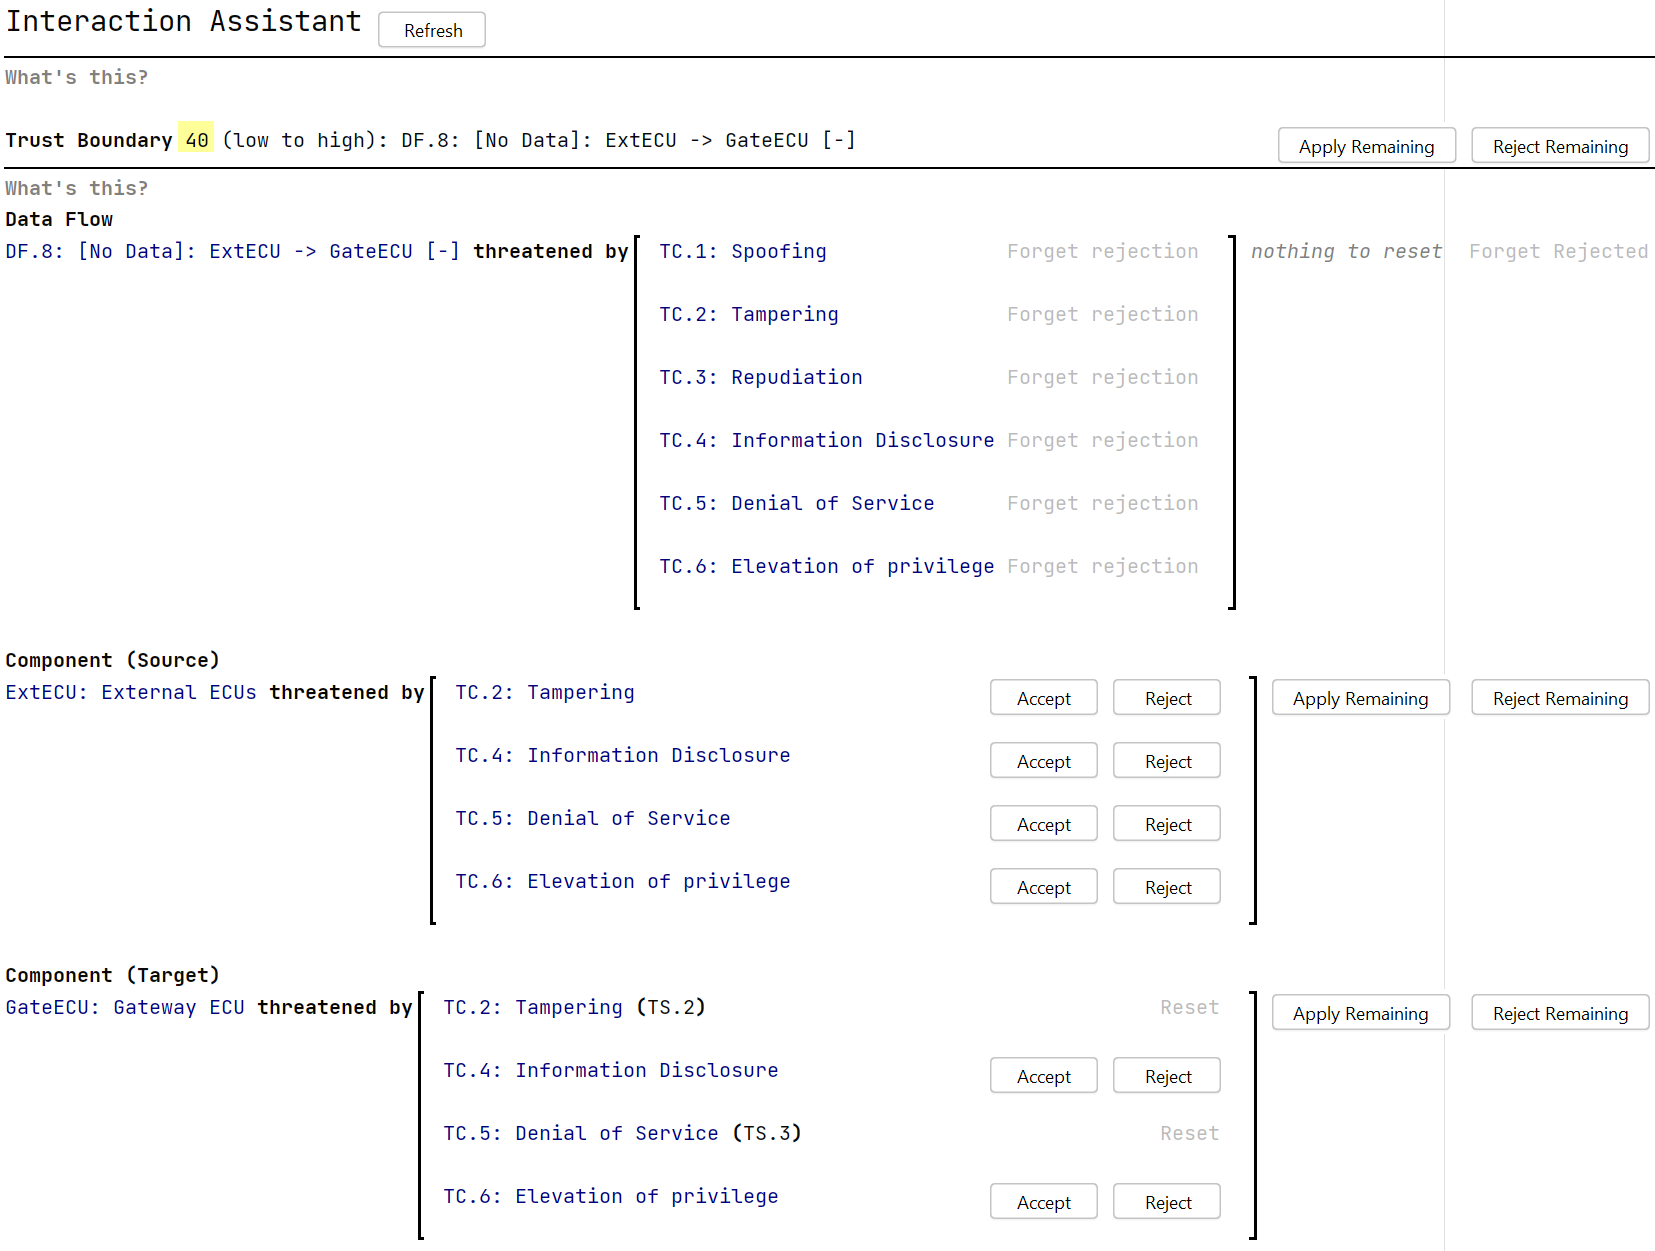
With the addition of new data points, we've introduced an Interaction Assistant that complements the existing Threat Scenario Identification Assistant. While the existing assistant uses the "STRIDE per element" approach, the new Interaction Assistant follows the "STRIDE per interaction" model. This means you can now assess Threat Scenarios based on interactions like Data Flows, emphasizing Trust Boundary ratings.
The Interaction Assistant works similarly to the original Threat Scenario Identification Assistant, allowing you to create Threat Scenarios for Assets based on Threat Classes, but with a focus on Data Flows. Data Flows are prioritized by Trust Boundary rating (from high to low), and within the same rating, those flowing from low to high Trust Level are listed first. Data Flows without a Trust Boundary rating are shown at the end.
Each Data Flow can be assessed individually, as well as its endpoints. This means the same Component might appear multiple times if it's involved in different Data Flows. When a Threat Scenario is created or rejected for a Component, this decision syncs across all occurrences of that Component in the Assistant, along with any rationale provided.
Key difference from the Threat Scenario Identification Assistant
Unlike the original Threat Scenario Identification Assistant, the Interaction Assistant is focused on interaction-based assessment, so Channels and unrelated assets are omitted. Components that do not serve as endpoints in one of the assessed data flows won't show up here.
Important note on using multiple assistants
Since both assistants target similar goals, it's crucial to ensure the assistant you're working with is up-to-date before acting on suggestions. We've implemented some safeguards to reduce potential sync issues between the two assistants, but errors could still occur if both are used simultaneously. To avoid confusion, consider either selecting one Assistant to work with exclusively or regularly refreshing each Assistant, especially if you switch between them for assessing Assets.
Updated Function Assignment
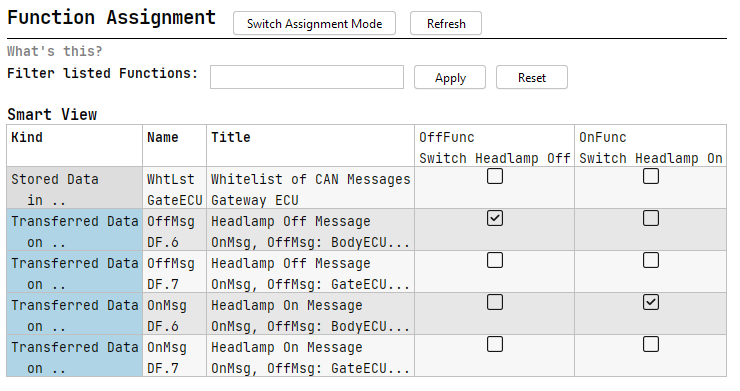
We've revamped the Function Assignment chunk, in an effort to ditch outdated technology and to add new features, improving both usability and layout. The classic layout will still be used by default for now. However, we plan to use the newer layout more prominently in the future and to eventually phase out the legacy version. If you want to give it a try, or switch back in case you encounter bugs with the new design or simply prefer the legacy version, you can use the actions View → Enable Classic/Modern Assignment View in the main menu.
Key Changes and Features
- Manual Refresh: Like our other assistants, the new editor doesn't automatically load new elements; instead, there's a Refresh button to update the view after any model changes. This also clears out any lingering references from deleted elements.
- Improved Layout: The assignment table has a clearer row and column order, though sorting by columns is no longer available. A new text-based filter helps you manage the display by hiding functions that don't match the filter criteria.
- Updated Views: We've made the following changes based on user feedback:
- Smart View (now the new default view): Emphasizes reasoning at a high level, making it easier and faster to understand assignments. The assignment state color coding has been replaced to capture more assignment states, and we've added clearer visuals for smart assignments that might be "blocked" by locked items. Additionally, actions in the Smart View are now immediately applied to the model, replacing the old Apply button.
- Detailed View: Formerly Simple View, this mode has a reworked UX. You can now toggle assignment states and lock/unlock assignments with dedicated buttons, and there are options to (re)set all buttons for a function.
Additional Notes
The updated interface also includes a What's This? section with detailed guidance on using the new features.
Finally, having multiple Function Assignment chunks in a project no longer causes model errors. Although it's generally best to use only one chunk per TARA model, this flexibility is there for projects involving multiple TARA models.
:::warning Known issue You may experience performance issues when utilizing the updated Function Assignment with larger models, particularly in memory-intensive workflows. Optimization for these scenarios is planned for future updates. For the meantime, try out the function-filtering or toggle to the legacy version. :::
New Support Page
We've added a direct link to our Secure Support Ticketing System, within the RCP. You can find it under the menu → Help → Submit Bug Report or Feature Request.
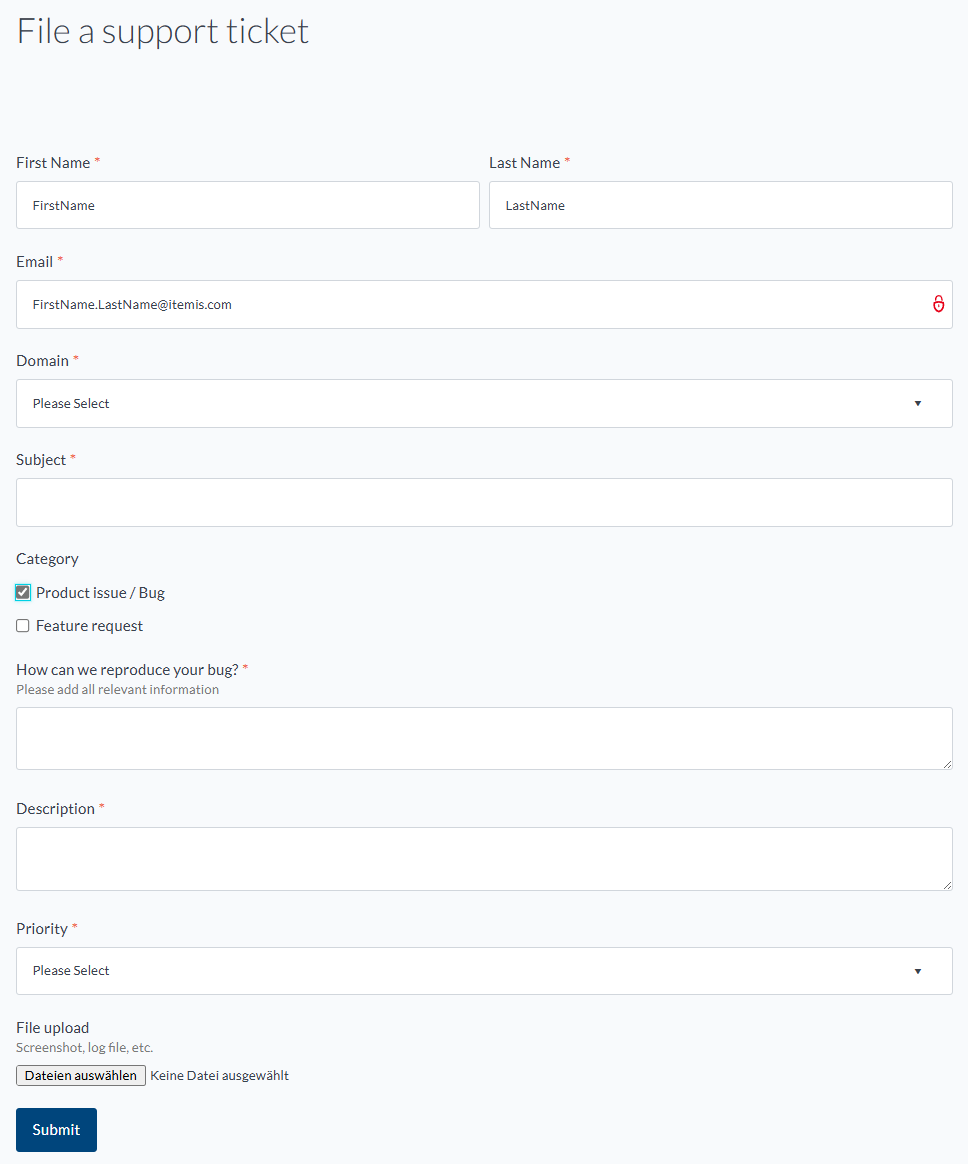
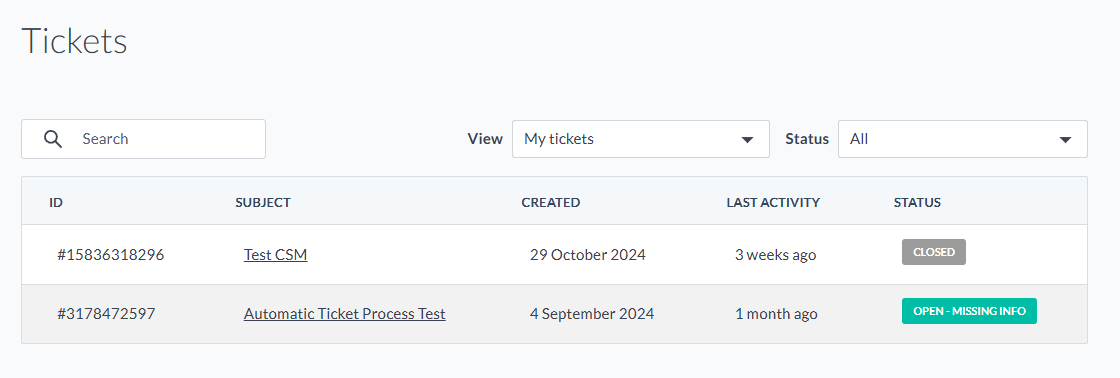
The System allows you to report bugs or request new features quickly. Once you have created an account, you can submit tickets directly and provide all the necessary information for us to assist you. This helps us ensure we receive all the necessary information from you, enabling us to maintain our proactive problem-solving approach and respond to you with a solution as quickly as possible.
We encourage you to use this streamlined process to manage your tickets and track their status conveniently within your account. You'll benefit from having all your open feature requests and additional questions organized in one convenient overview, where you can also initiate further conversations for each ticket.
Performance
There are ongoing efforts to analyze and enhance the tool's performance. This time we focused on some of our most problematic chunks.
Attack Feasibility Location
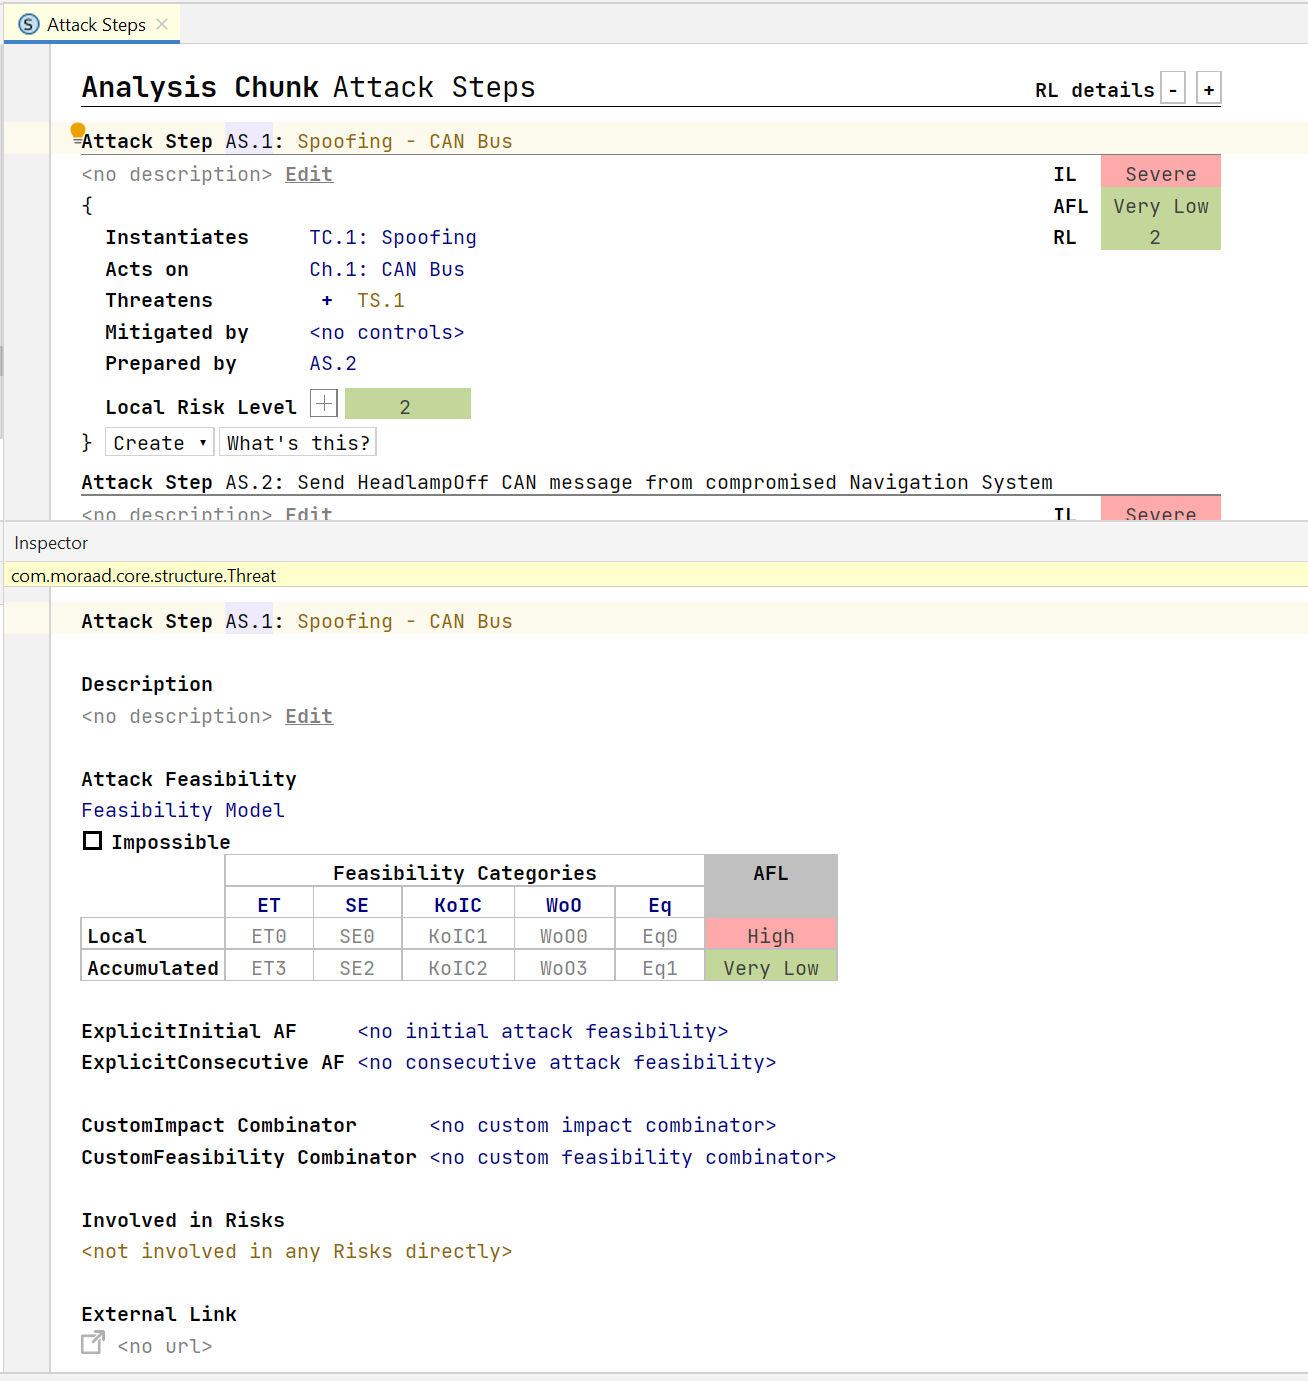
We've made changes to improve performance in areas that previously caused slowdowns, especially for Attack Steps, Controls, Threat Classes, and Control Classes. A key improvement is an option to move resource-heavy tables out of the main editor, which reduces system load for larger models. You may toggle it via View → Toggle AFL Table Location.
While this means you won't be able to view multiple Attack Steps at once, the performance boost makes working with larger models much smoother. This option can be easily toggled on or off as needed.
If you're still experiencing performance issues, we'd love to hear your feedback. Feel free to reach out so we can work together on further improvements.
Preserve Calculation Results when Changing Settings
We've improved how calculation results are handled after making changes in the itemis SECURE General settings. Previously, any change would invalidate all cached results, forcing a full recalculation — even if most results stayed the same.
Now, the system uses smarter logic to decide when recalculations are actually needed. While this may not drastically improve overall performance, it can reduce delays and improve responsiveness.
Report Improvements
We've made several improvements to reporting for better clarity, usability, and customization. These changes aim to make reports more user-friendly and informative for all stakeholders.
Rationales in Attack Step and Control Tables
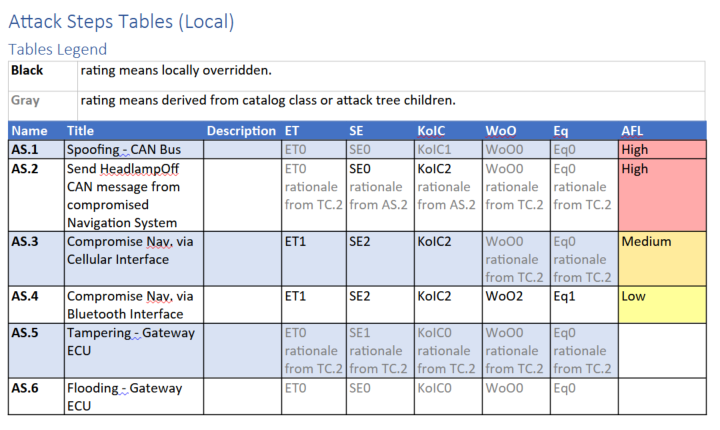
Previously, only local rationales (added directly to Attack Steps or Controls) appeared in result reports. Now, if you enable export rationale in the inspector of these two report items, the reports will also include rationales inherited from catalog classes. This ensures all relevant motivations are visible, whether locally configured or inherited.
Stakeholders in Damage Scenario Tables
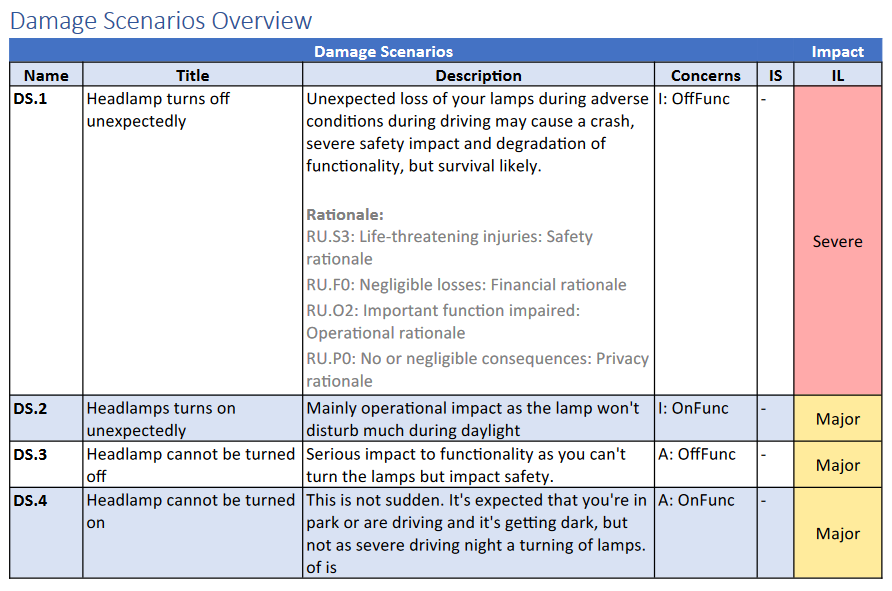
We've reintroduced stakeholder information to Damage Scenario overview tables. Both the name and title of Impact Options are now displayed, providing clearer semantic links. While this takes up more space, it eliminates ambiguity and ensures all critical information is available. Additionally, we streamlined the rationale export: instead of repeating the rationale keyword for every entry, it now appears once for all listed rationales in a block.
Meaningful Report Names
Reports now have default names that include basic details to help identify the model or report. While they're still stored in a temporary location, this change makes it easier to recognize reports at a glance. Remember to save reports to a permanent location if you want to keep them.
Report Template Default Language
Reports were previously set to German as the default document language, which wasn't ideal for many users. The default language is now English. If you're working in another language, you may still need to adjust the language in the generated report for full compatibility with Office tools.
Import/Export Improvements
We continued our efforts to better integrate SECURE into existing tool chains by improving the import and export functionality.
New Catalog Import/Export Actions
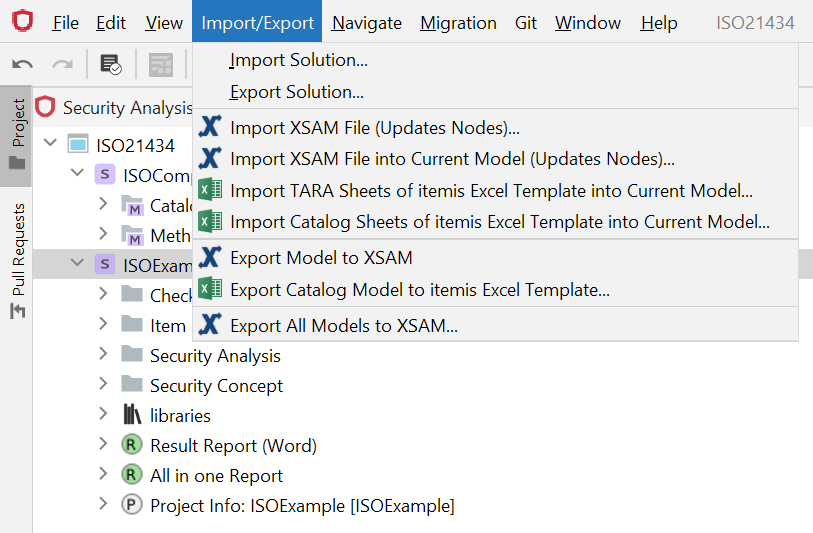
We've introduced replacement actions for the previously deprecated catalog import/export features. The new process uses the itemis Converter Service to handle Excel data through XSAM formatting. This streamlines maintenance and ensures consistency.
New actions:
- Import Catalog Sheets of itemis Excel Template into Current Model
- Export Catalog Model to itemis Excel Template
Renamed action:
-
Import itemis Excel Template into Current Model is now called Import TARA Sheets of itemis Excel Template into Current Model
Improved Chunk Management
Issues with chunk IDs during imports have been addressed. Now, imported data will update existing chunks rather than duplicating them, provided the chunks are properly matched.
Remove pre-existing chunks before importing to avoid duplicates if you want to use a new catalog and not update the existing one. Updates from external sources will then seamlessly sync with your current project.
Bug Fixes for XSAM Serialization
We've resolved several serialization issues:
- Feasibility Model references (e.g., Controls and Attack Steps) are now serialized correctly.
- Duplicate descriptions in Sequences chunks are no longer a problem.
Version Tracking for Tools and Language
To help link older projects with the tool version used to create them, we added version details in both the RCP and exported XSAM files:
-
Exported XSAM files now include
coreVersion(core language version) andtoolVersion(RCP version). For example, this release will show "coreVersion: 93" and "toolVersion: 24.3". -
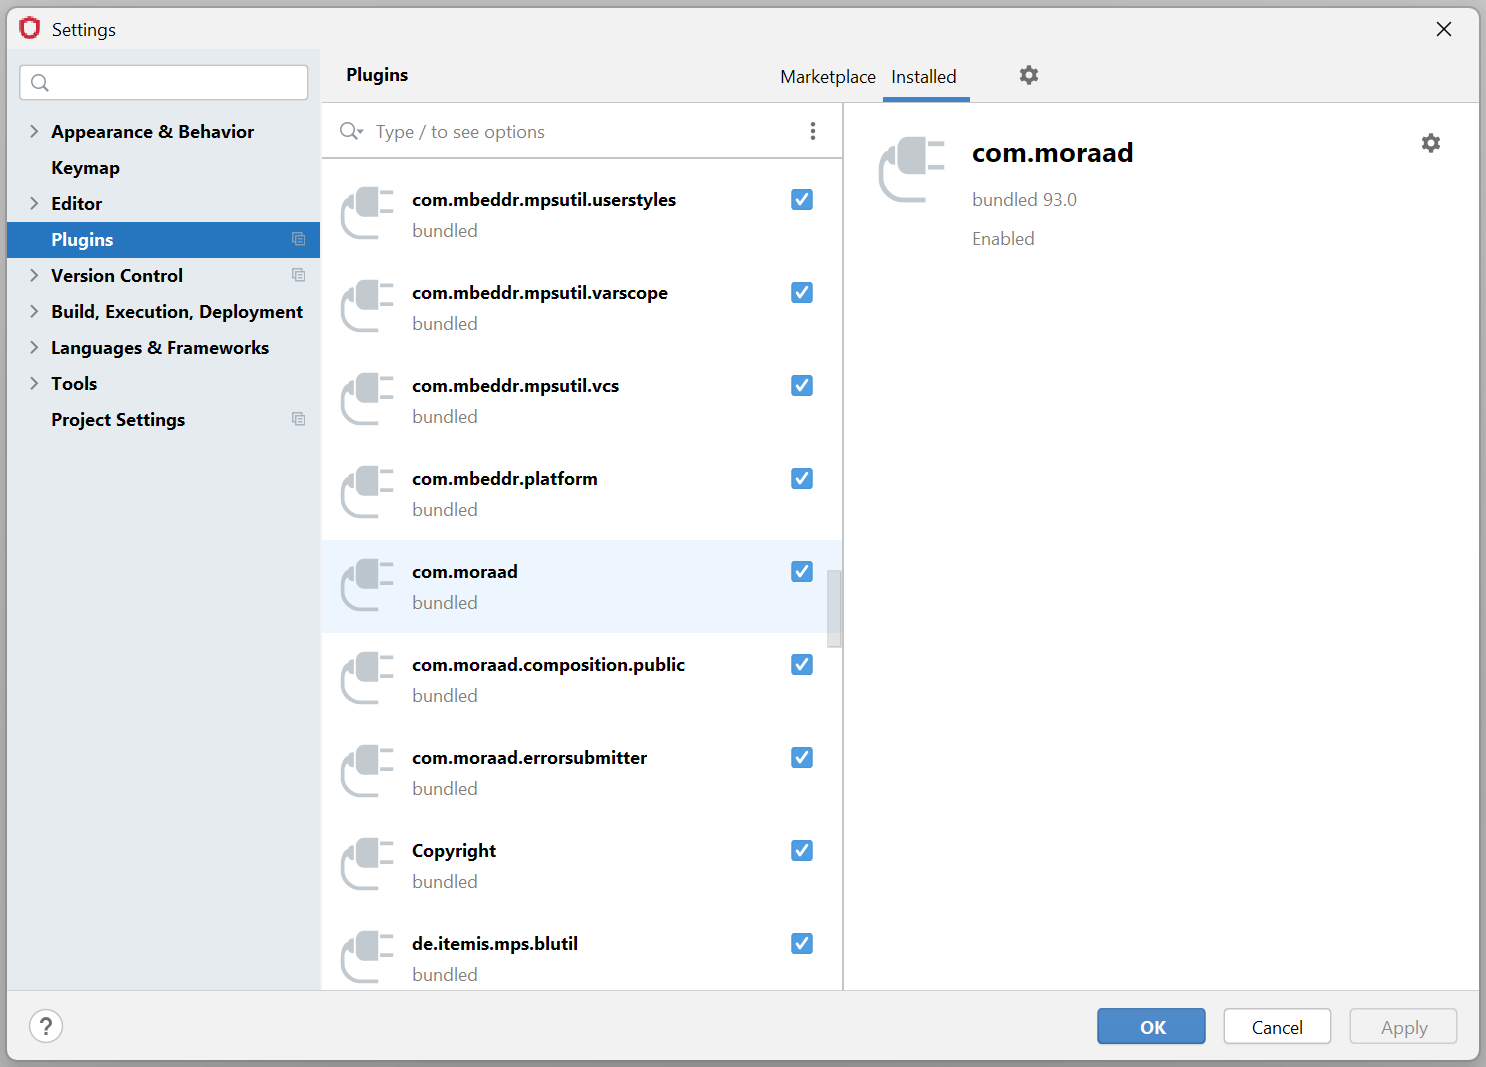
The core-language version is also discoverable in the RCP under Settings → Plugins → Installed → Other Tools → com.moraad. Searching for "com.moraad" provides a quick way to find it.

Assistant Improvements
We took steps to further improve the assistants' workflows.
Improved Assistance for Damage Scenarios
When using the Asset Identification Assistant to create new Damage Scenarios, the process is more streamlined now.
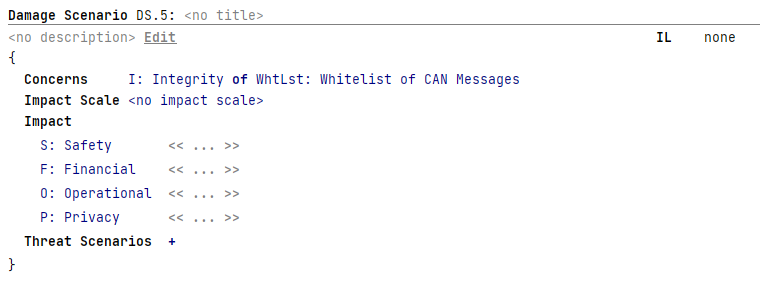
Previously, each newly created Damage Scenario started empty, requiring you to manually configure the applicable Impact Categories. With the update, the assistant will now auto-fill the Impact Categories based on the used Impact Model.
This saves time by pre-populating the Categories, so you only need to specify the relevant Impact Options. If any auto-filled Categories aren't needed, you can easily remove them or leave them empty — this won't affect the Damage Scenario's Impact Level. This enhancement aims to reduce manual effort and make configuring new Damage Scenarios quicker and more intuitive.
Fixed assistant deleting too many elements
A rare issue in the Threat Scenario Identification Assistant has been resolved. Previously, if a Threat Class no longer listed an asset's type as valid, all Threat Scenarios for that asset were flagged for deletion, even when other Threat Classes still supported the asset type. After user confirmation, these scenarios were unnecessarily removed, causing potential data loss.
With this release, the assistant now properly verifies each Threat Scenario's Threat Class before marking it for deletion, ensuring no unrelated scenarios are affected. This fix prevents accidental deletions and improves the assistant's reliability.
Custom Checklist Creation and Export Enhancements
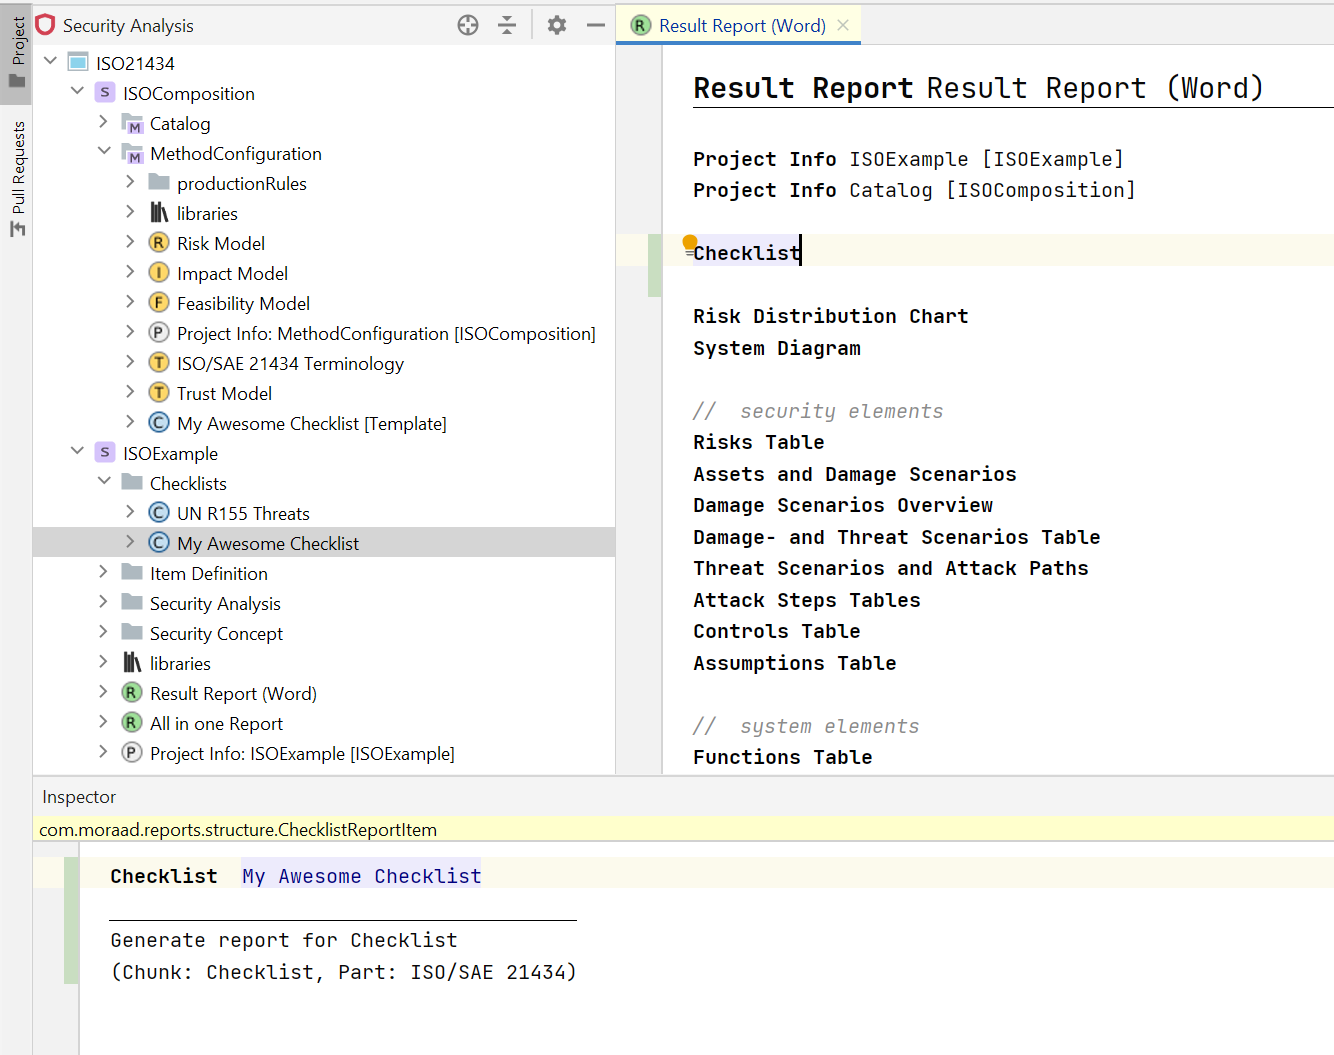
The RCP now allows you to create and use custom checklists, addressing a long-standing limitation. Previously, only the pre-defined "UN R155 Threats" Checklist was available for assessing modeling progress. With this release, you can define your own checklists, enabling a tailored approach to your projects. While creating custom checklists may require some initial effort, the benefits of personalized assessments make it worthwhile.
Key updates:
-
Checklist Templates:
- Create custom templates via the New Roots context menu under Utilities.
- Use these templates across models (e.g., in TARA models) by importing the configuration where the template was created.
- Templates are now clearly marked with
[Template]in the Project View for easy identification.
-
Report Enhancements:
- The checklist report item now allows selection of specific checklists for export, supporting projects with multiple checklists.
- This update makes checklists more flexible and integrates seamlessly into your workflows.
Miscellaneous
Last but not least we improved the workflows in various aspects of the tool to better assist you with performing your TARAs.
Rename functionality for Hierarchical Types
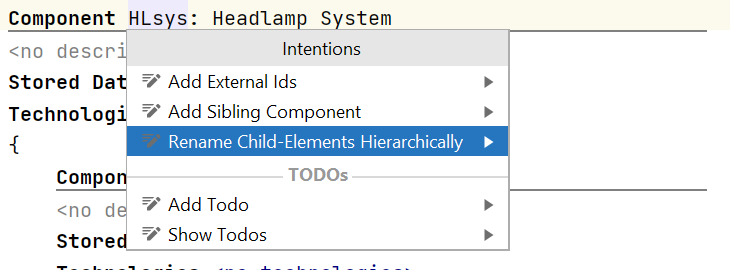
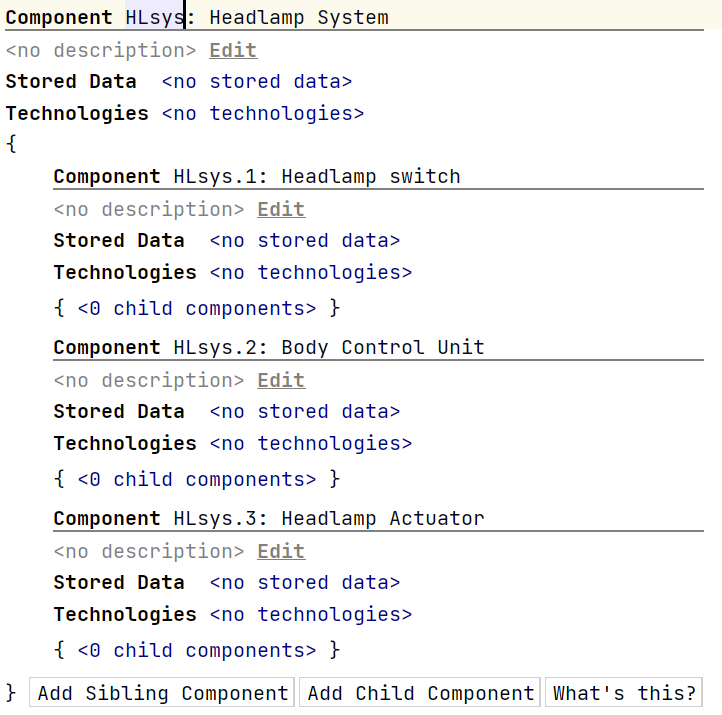
The management of hierarchical types such as Components, Functions, and Trust Zones has been simplified with the introduction of a rename feature. This allows you to align the names of parent and child elements based on a common scheme. The naming convention propagates automatically throughout the hierarchy when triggered (via Alt+Enter) and can be customized using separators defined in the Terminology Profile. New sub-elements will still be auto-named using the global naming-pattern of the respective type by default but can be re-aligned later.
Multiple Risks per Goal/Claim
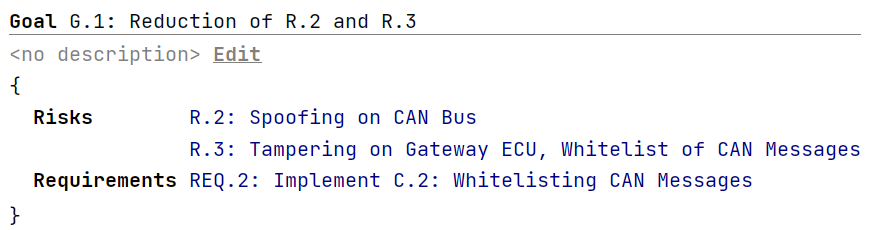
Goals and Claims can now link to multiple Risks, which reduces redundancy and simplifies model structures. While the Assistants will still guide you to create one Goal or Claim per Risk for clarity, this change provides the flexibility to consolidate related Risks into a single element, if needed.
Unique Naming Enforcement
To enhance usability and prepare for web-based implementations, unique naming for all elements is now enforced. This resolves any confusion caused by duplicated names, which, while technically acceptable in the RCP, often led to ambiguities. With this adjustment, workflows are more intuitive, and the system is better aligned with web functionalities.
Risk Discoverability
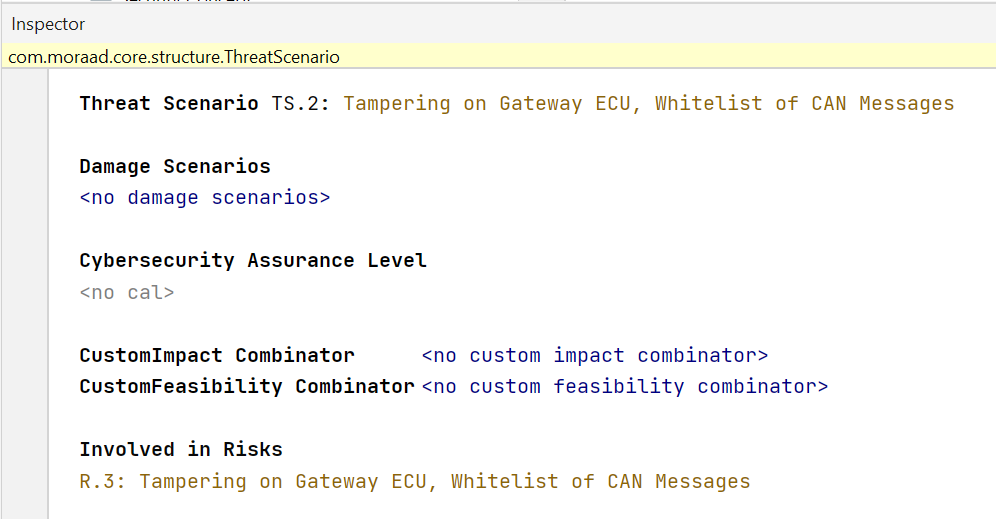
Risk discoverability has also been improved. The Inspector for Attack Steps and Threat Scenarios now lists Risks directly caused by the selected element. While this view does not include transitive relationships, it makes immediate causal links more accessible, simplifying navigation and analysis.
Improved Multi-Model Deletion
For models that appear collapsed in the project view we offered an action to delete the model from the project. You can now delete multiple models of that kind from your project in one go. Previously, even if you selected several models, you could only delete them one at a time. With this update, we've removed this limitation, making it easier and faster to clean up your project when working with these standalone models. Just select all the standalone models you want to remove, and the action will now handle them all at once.
Streamlined Context Menu in Project Tree
The New Roots menu has been updated. Redundant entries that created duplicate or broken chunks have been removed. Additionally, in accordance with the introduction of the Concept Phase, the Risk Treatment Chunk has been moved from Security Analysis to Security Concept to better reflect its purpose.
Streamlined License Import
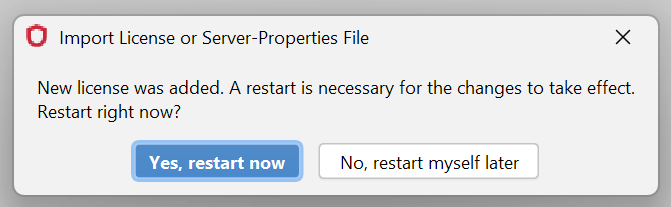
Importing a new license has also been streamlined. After a license is imported, the RCP now offers to restart automatically so that the new license can take effect immediately. Just ensure that all edits and processes are completed before accepting the restart prompt.
Other Usability Improvements
Finally, several bug fixes and usability improvements round out this release. Links that were previously locked, such as the several maximum levels of Assumptions, can now be deleted again. Additionally, usability for Risk Treatments has been enhanced with clickable "treat via" decisions, making the system easier to navigate without relying on keyboard shortcuts.
These updates aim to improve efficiency, usability, and alignment with modern workflows while preparing for a seamless web integration in the future.
Version Mapping
The following table can be used to determine the itemis SECURE version based on the internal plugin version com.moraad.core stored in the .msd file of every solution:
<language slang="l:2bca1aa3-c113-4542-8ac2-2a6a30636981:com.moraad.core" version="<com-moraad-core-version>" />
| com.moraad.core version | itemis SECURE version |
|---|---|
| 93 | 24.3 |
| 92 | 24.2, 24.2.1 |
| 91 | 24.1 |
| 90 | 23.3 |
| 89 | 23.2, 23.2.1 |
| 88 | 23.1.1 |
| 87 | 23.1 |
| 86 | 22.4 |
| 81 | 22.3 |
| 80 | 22.2 |
| 78 | 22.1 |
| 74 | 21.3 |