Configuring your traceability environment Copy link to clipboard
In order to start using itemis ANALYZE, you have to configure your project-specific traceability process and environment. For example, you can configure which tool adapters itemis ANALYZE should use to access data, how artifacts are recognized and how links between them can be created.
This information resides in a configuration file, typically, but not necessarily, named conf.analyze. The following sections explain how to use the configuration editor to create or modify a configuration and how to toggle between different configurations.
Starting from scratch using the setup wizard Copy link to clipboard
If you are starting up itemis ANALYZE for the first time or on a new project, you won’t have a configuration yet. You might not even have any Eclipse projects at all yet, let alone the data for your ANALYZE project available in Eclipse projects.
The setup wizard is here to help you get up to speed quickly. It offers three major ways to go in order to get a ANALYZE configuration:
- You can import a ANALYZE configuration that exists elsewhere already.
- You can create a completely new ANALYZE configuration.
- You can activate a ANALYZE configuration that already exists somewhere in your workspace, but is not active at the moment.
We will explore all of these options one by one subsequently. However, let’s first have a look at how to start the setup wizard.
Starting the setup wizard Copy link to clipboard
To start the setup wizard, carry out one of these two options:
- If the ANALYZE views on your workbench show the message "You need an active configuration to use itemis ANALYZE. Use our guided wizard in „ANALYZE → Configuration → Start setup wizard”.", you can click on "Start setup wizard" to do just that.
- Select ANALYZE → Configuration → Start setup wizard in the main menu.
The setup wizard looks like this:

The setup wizard
Importing an existing configuration Copy link to clipboard
The typical use case for this option is that you already have an existing ANALYZE configuration. However, it is not in your workspace, but in a project somewhere else. To import such a project, including its configuration, perform the following steps:
- Select "Import an existing configuration" in the setup wizard.
- Click on the Next button.
This will bring up the Eclipse import wizard, which generally allows you to import various kinds of resources into your workspace. In this case, however, only three or four of them deserve our attention. Figure “Importing an existing configuration” shows these options being unfolded, i.e., their respective parent „folders” being opened.
- General → Existing Projects into Workspace: expects the project to be imported in a directory in your file system.
- Git → Projects from Git: expects the project to be imported in a Git repository.
- And perhaps File System, which allows to copy any existing directory/file structure – not necessarily Eclipse projects – into a project in your workspace.

Importing an existing configuration
Please choose the variant that suits your needs, then click on the Next button. Depending on your choice, further dialogs will open and guide you through the import process.
Please note: When importing a project from a local directory, you can choose whether you want to copy the existing project into your workspace or to directly work with the existing project. In the latter case, any changes will be made to the already existing project. In the former case, you have to check the "Copy projects into workspace" option in the Import projects wizard. Any changes you will make later will be done to the copy and will leave the already existing project untouched.
After importing a project, a ANALYZE configuration contained therein will not automatically be activated. Thus the setup wizard proceeds to activating an existing configuration, please see below for details.
Creating a new configuration Copy link to clipboard
The setup wizard’s "Create a new configuration" option is especially useful if you don’t have an existing ANALYZE configuration anywhere and possibly don’t even have an Eclipse project yet. So this is the „real” starting-from-scratch scenario.
- In the setup wizard, select "Create a new configuration".
- Click on the Next button. The "Add new configuration" dialog appears.
- Enter the name of the configuration file into the Name text field. An ANALYZE configuration file must have the filename extension .analyze. If you do not specify it or enter a different extension, ANALYZE will append .analyze to the filename you provided automatically.
- The
Parent project text field specifies a project and optionally a folder the configuration file should be created in. You can click on the
Browse button to select an already existing location. Alternatively, you can type the names of the project and/or folder structure to create into the text field. The format is
/project/folder_1/folder_2, i.e., it starts with a slash (/) and the project’s name and is optionally followed by a slash and an arbitrary number of folder names separated by slashes. - Click on the Finish button. The configuration file will be created and opened in the configuration editor.
The example shown in figure "Creating a new configuration" will create the configuration file config_1.analyze (the .analyze will be added automatically). The file will be created in a project named my_project. If that project does not yet exist, ANALYZE will create it, after asking the user for confirmation. The configuration file will be placed into the a/configurations folder, which is located in the project my_project. If any of these folders do not yet exist, ANALYZE will create them.

Creating a new configuration
If you want to import any data into your workspace in the same step – typically data you want to extract traceable artifacts from –, check the "I also want to import existing data into my workspace" checkbox and click on the Next button. The Eclipse import wizard will open and let you import whatever you want to import.
Clicking Finish in the import wizard will start the actual import. After that, the wizard will close and leave you with the newly-created configuration file in the configuration editor.
Activating an existing configuration Copy link to clipboard
itemis ANALYZE will not automatically activate any imported configuration. This is a step you will have to make explicitly.
While the configuration editor allows you to activate the configuration you are currently editing by clicking on the "Set as current configuration" button, the setup wizard searches your whole workspace for ANALYZE configuration files and lets you choose one for being activated.
- On the wizard’s start page, select the "Activate an existing configuration" option.
- Click on the Next button.
- In the dialog that opens next, select the configuration you want to activate in the drop-down menu.
- Click on the Finish button.
- The selected configuration will be activated.

Activating an existing configuration
If you want to import any data into your workspace in the same step – typically data you want to extract traceable artifacts from – check the "I also want to import existing data into my workspace" checkbox and click on the Next button. The Eclipse import wizard will open and let you import whatever you want to import.
Clicking Finish in the import wizard will start the actual import. After that, the wizard will close and leave you with the activated configuration file in the configuration editor.
Configuring your traceability environment using the configuration editor Copy link to clipboard
If you have not yet set up or created a current configuration, you should consider starting from scratch using the setup wizard.
In order to edit your ANALYZE configuration, open the ANALYZE Configuration Editor by selecting
ANALYZE → Configuration → Open current configuration
from the main menu.
To add a new configuration, select
ANALYZE → Configuration → Add new configuration
instead. The latter is the only operation you can perform if you don’t have a configuration yet. It will open the dialog for creating a new configuration.
General structure of the configuration editor Copy link to clipboard
The ANALYZE configuration editor is structured into three tabs: Data access, Artifact types, and Link types.
In each of these tabs you can edit different configuration aspects for your specific project environment. The structure of the tabs is essentially the same: At the top, there is a table-based overview of the available data accesses, artifact types, or link types, respectively. You can add new elements or remove existing ones by use of the
 or
or
 icon, respectively. Furthermore, it is possible to search for specific elements in the table: If you type a string into the search field near the top, all elements matching your input will be highlighted.
At the bottom of each of the three tabs, there is a details area where you can set up a specific configuration: If you select a row in the table at the top, the details area shows the configuration of the selected element. The configuration is done using a textual configuration language. While configuring elements, ANALYZE supports you by content assist: If you press
[Ctrl] + [Space] ANALYZE shows proposals for suitable keywords and needed input.
If you need more space to edit one of the areas, you can fold the other one. Click on the arrow next to the area’s headline to fold or unfold it.
The bar at the top of the configuration editor displays whether or not the configuration opened in the editor is the active configuration. It is colored green when there are no unsaved changes and turns yellow as soon as you make any modifications. The „Save” button saves all changes to the configuration, while the „Reset” button discards all unsaved changes. The button „Set as active configuration” makes the configuration opened in the editor the active configuration.
Activating different configurations Copy link to clipboard
It is possible to have different configuration files. However, only one configuration will be active at a given point in time. If you want to activate a different configuration file, open it in the Project Explorer, and in the ANALYZE Configuration Editor press the Set as current configuration button. This button will only be active if the opened configuration is not the current one. This way you can see which configuration is the active one. Selecting ANALYZE → Configuration → Open current configuration from the main menu will always open the current configuration.
Data accesses Copy link to clipboard
Use the Data Access tab to configure trace data accesses. A data access is used to provide access to all kinds of trace data repositories. For example, you can configure that ANALYZE should have access to a specific Excel file located in the workspace or to a specific IBM DOORS project on a remote server.
ANALYZE can aggregate the traceability data from multiple data accesses. The tool makes all loaded links from a data access visible to the user.
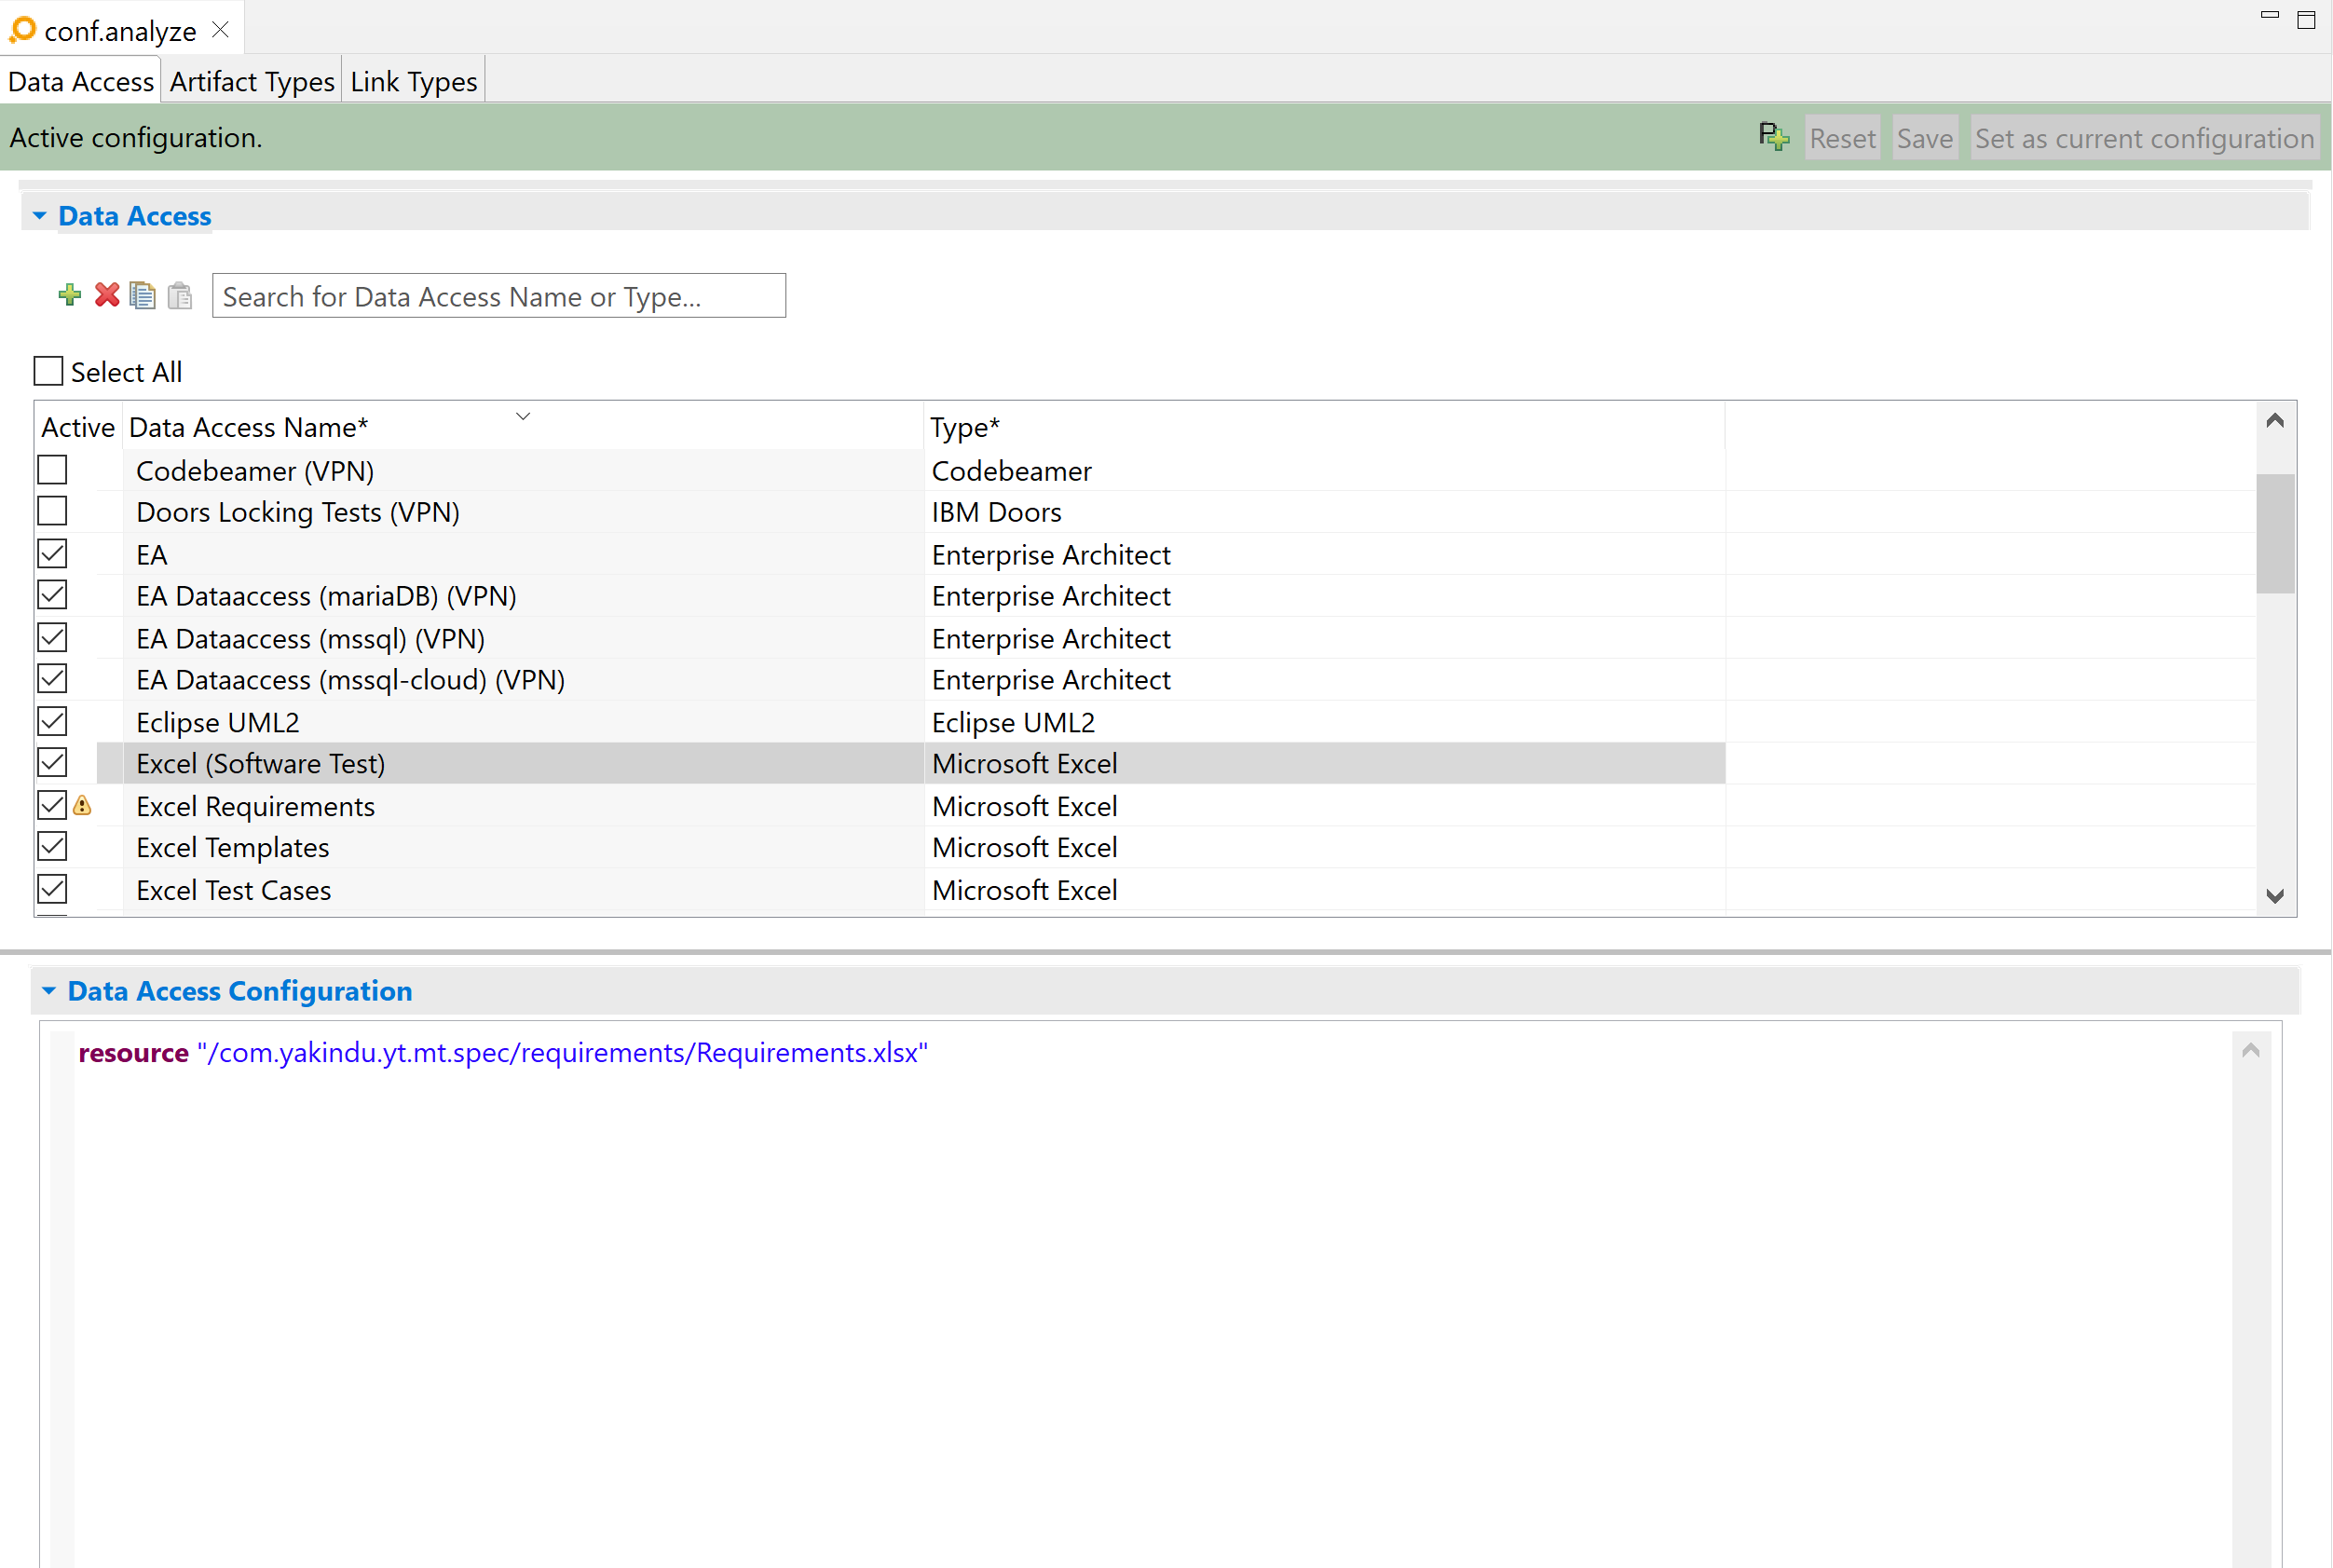
You can (optionally) indicate a template to be used for the data access configuration by selecting it from the other drop-down menu. When you click on the Create button the new data access will be added to the list of data accesses. Using the Active checkbox in that list, you choose whether the links belonging to the respective data access will be visible in ANALYZE or not.
You can add a new data access using the
icon in the
Data access tab. This will open the
Add new data access dialog. Enter a name into the
Name field. Assign a type for the data access by selecting it from the
Type drop-down menu. If the name of a data access type is followed by „(No License)”, this means that there is currently no license available for the corresponding adapter.
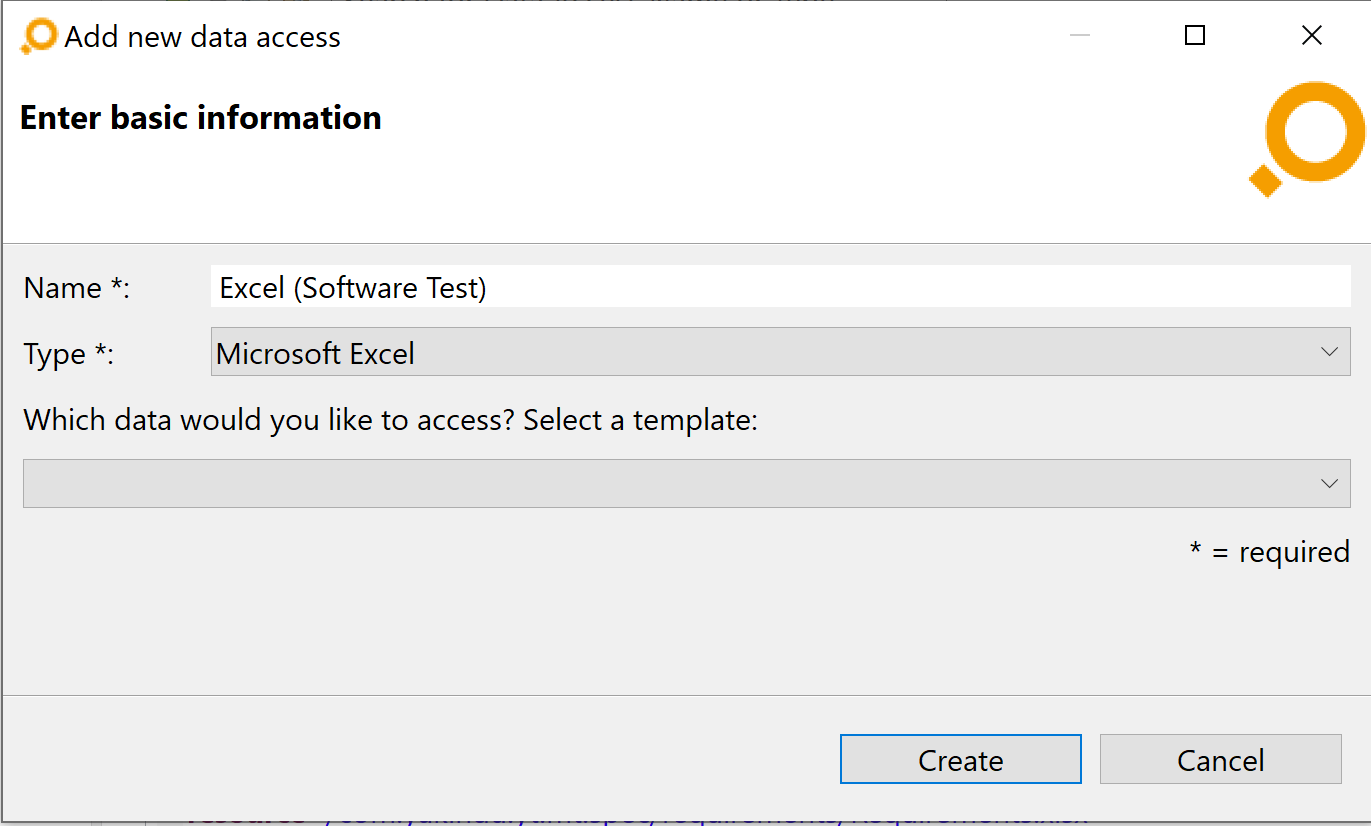
After having selected a specific data access in the table, you have to configure the source of the data. Depending on the type of the data access, the configuration differs. Have a look at the reference section on adapters which details data access configuration for various adapters.
Artifacts and artifact types Copy link to clipboard
Artifacts, sources, and data accesses Copy link to clipboard
Artifacts are the centerpieces of ANALYZE. Examples for artifacts are requirements written in Word files, Java source files, test specifications in PTC Integrity, test results in XML documents, etc.
Artifacts are part of a source. For example, if the artifact is a cell range in an Excel file, that Excel file is the artifact’s source. In principle, a file itself can represent an artifact, for example a file containing some binary data. However, an artifact does not necessarily have to reside in a file. The artifact’s source could be some server-based technology, like, e.g., PTC Integrity or IBM DOORS. In these cases the source would be the server and a so-called project.
ANALYZE reads or writes a resource by means of a data access. In order to access a particular resource an associated data access must be configured in the ANALYZE configuration.
Artifacts can be linked to other artifacts from the same or different sources.
Artifact properties Copy link to clipboard
Artifacts usually have properties. For example, a file in the filesystem has a timestamp property, telling the point in time when the last modification to this file has been done.
Which properties exist for a given artifact is inherently dependent on the kind of artifact in question. For example, a bookmark in Word has document properties and a requirement in an IBM DOORS module can have a status.
Standard attributes of artifacts Copy link to clipboard
Each artifact has four standard attributes.
- name: The human-readable name of a the artifact. Example: the title of a requirement in an Excel file.
- position: The machine-readable position of the artifact within a container. Example: the coordinates of a cell in an Excel file, i.e., the triple [worksheet; row; column].
- source identifier: The machine-readable name of an artifact’s source. Example: the path name of an Excel file.
- artifact type: The artifact type defined in the ANALYZE configuration. The concept of artifact types is explained below in more detail. Example: „Customer requirement”.
Custom attributes of artifacts Copy link to clipboard
In addition to properties and standard attributes you can define custom attributes. Custom attributes can be derived from the underlying artifact. They are configured in an artifact type.
Artifact version Copy link to clipboard
A fundamental concept of traceability is the ability to detect changes to artifacts. A change to an artifact is traced by its version. The version of an artifact is typically derived from its custom attributes and/or from properties like the timestamp. The version is not derived from the artifact’s standard attributes.
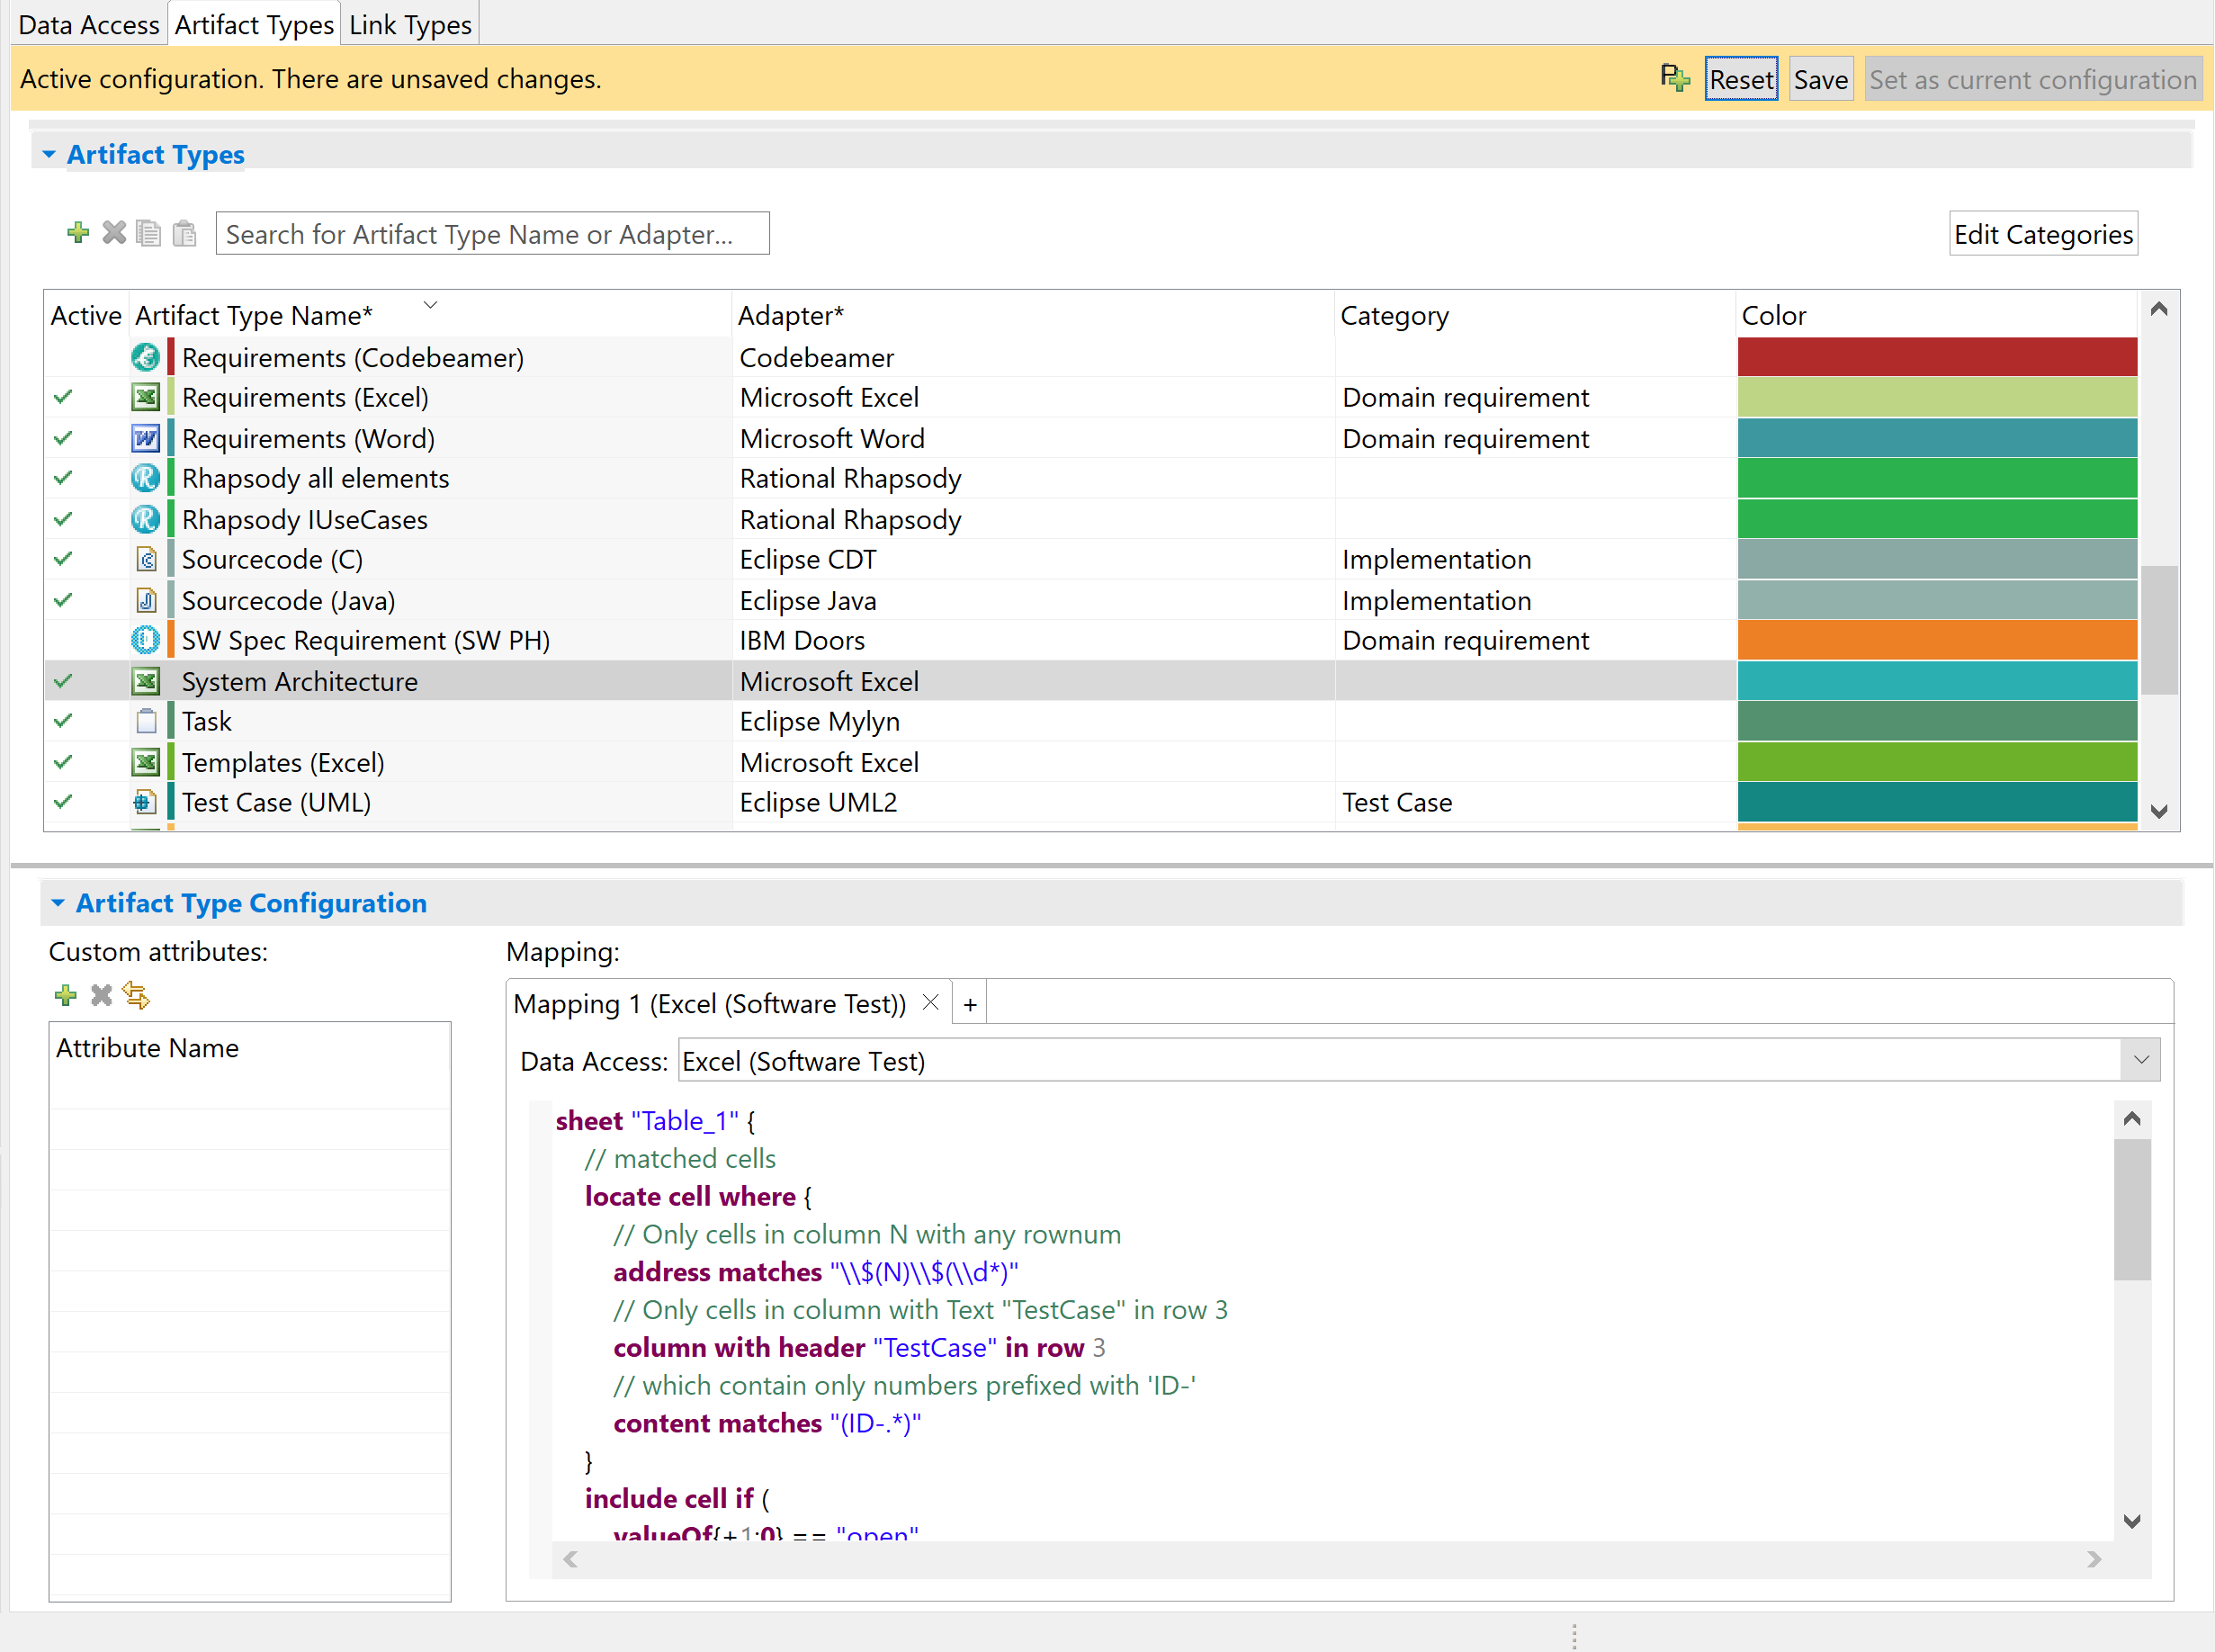
Artifact types Copy link to clipboard
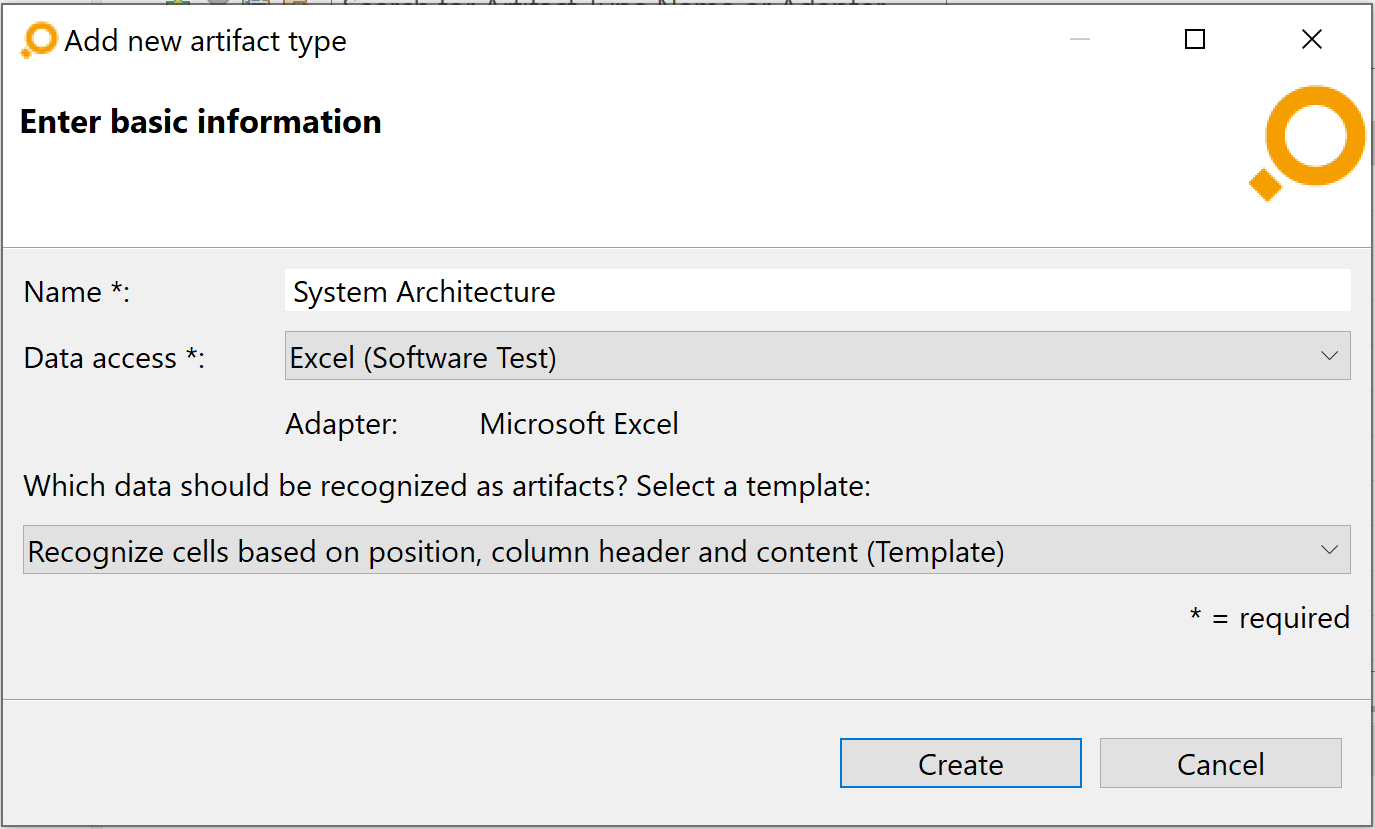
You can add a new artifact type using the
icon in the
Artifact type tab. This will open the
Add new artifact type dialog. Enter a name into the
Name field. Assign the corresponding data access by selecting it from the
Data access drop-down menu. If the name of a data access is followed by „(No License)”, this means that there is currently no license available for the corresponding adapter.
You can (optionally) indicate a template to be used for the artifact type configuration by selecting it from the other drop-down menu. When you click on the Create button the new artifact type will be added to the list of artifact types.
In the Artifact Type Configuration area at the bottom of the tab, you can create so-called mappings for the artifact type selected in the Artifact Types table.
Each mapping defines a way to derive artifacts of the artifact type in question. You can (optionally) configure the mapping by using a textual configuration language that is specific to artifacts of the selected adapter. You can edit the mappings in the detail area in the tabs under the caption „Mapping” in the detail area. Alternatively, you can edit each mapping in a separate dialog that opens when you double-click the title of the tab. You can open several of these dialogs at the same time.
Depending on the language, you might be able to refer to custom attributes of the artifact type. You can configure the list of custom attributes on the left side of the details area. For each mapping, you can define the data access from which to derive artifacts (<implicit> assigns no data access).
The Active column in the Artifact Types table shows whether any mappings are active for the respective artifact type. This depends on the activation status of the referenced data access: If it is not active, the corresponding mappings of the artifact type will also not be available. The Active column for an artifact type shows a green check mark if all mappings of the artifact type are active. If no mapping is active it shows no check mark. In all other cases (i.e., at least one mapping is inactive and at least one mapping is active), it shows a grey check mark.
Assigning a category
In order to group artifact types and handle them collectively – e.g in reports – artifact type categories can be configured. The default category of an artifact type is „NONE”, i.e., no category. You can assign a category to an artifact type by selecting it from the Category drop-down menu in the Artifact Types table.
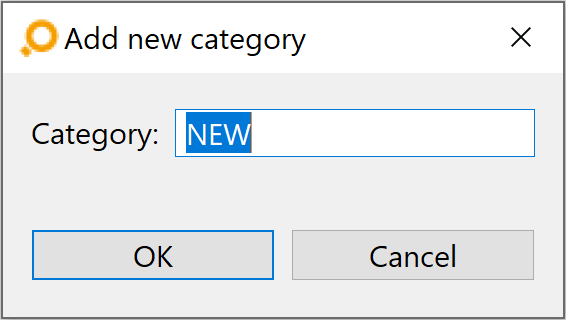
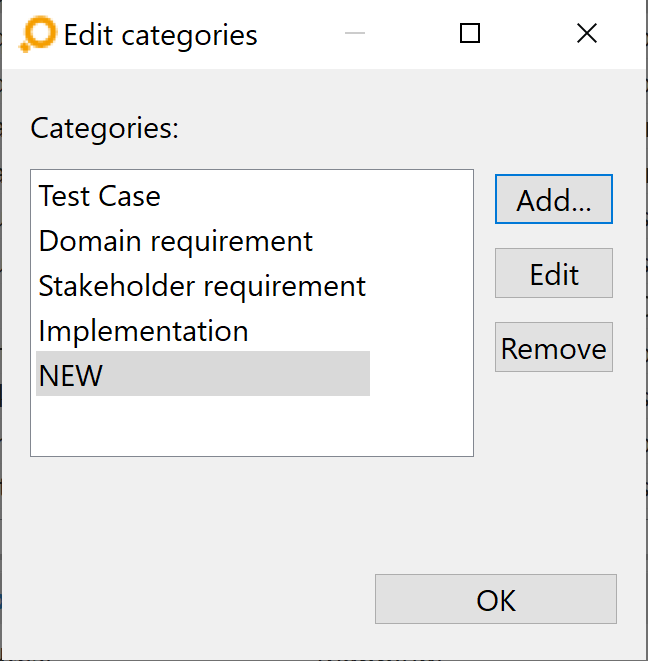
The elements shown in this drop-down list are individually configurable. If you wish to add categories, click on the Edit Categories button above the table in the Artifact Types tab. If no category exists yet, the Add new category dialog opens, asks for a new category name, and then you should proceed as described below.
If any categories exist already – and if it is the just-added first one only – the Edit Categories dialog lets you add, edit and remove categories.
Configuring an adapter
An adapter is a tool-specific interface. The selectable tool adapters depend on the features installed in ANALYZE. Each adapter comes with its own configuration allowing to specify how to identify valid artifacts. See the reference section on adapter configuration for details regarding the configuration of the various adapters.
Configuring custom attributes for artifact types
Some artifact types support the mapping of values derived from an artifact to custom attributes, according to the textual configuration of the artifact type. For example, you could create a custom attribute ID and map the value of a cell in an Excel sheet to this attribute. This means, every artifact of this artifact type has an additional attribute ID containing a specific value from the respective Excel sheet.
To create such a mapping, define custom attributes in the Artifact Type Configuration area of the Artifact Types tab. There are two ways to create them:
- Manually create new attributes via the
icon below the
Custom attributes label. In the
Mapping area, reference the added custom attributes.
- Alternatively, reference non-existing attributes in the
Mapping area as if they already existed. Then click on the
 icon below the
Custom attributes label. All mapped attributes that are not yet contained in the custom attributes list will be added to it.
icon below the
Custom attributes label. All mapped attributes that are not yet contained in the custom attributes list will be added to it.
Defining custom names of artifacts
For many adapters, the name of an artifact displayed in the ANALYZE views can be defined in the mapping area.
Some adapters, like Eclipse Explorer or Eclipse JDT, support custom artifact names by the keyword nameRule which is used to manipulate the name proposed by the artifact provider. The keyword ArtifactName following nameRule is a surrogate for the name proposed by the specific adapter. It can be modified by using the functions matches, trim, and replace:
- matches: Takes two arguments. First, a regular expression and second, a reorder string that defines how the groups identified by the regular expression should be reordered.
- trim: Parameters are a length and a trim strategy. While the first parameter specifies the length of the output string, the trimming strategy specifies whether the name should be cut at the beginning (KEEP_SUFFIX), at the end (KEEP_PREFIX), or in the middle (TRIM_MIDDLE). The removed part will be marked by ‚…’.
- replace: The first parameter is a search string. The second parameter is a replace string. It replaces all occurrences of the search string by the replace string.
All functions can be called multiple times on one ArtifactName, e.g., ArtifactName.replace("search","find").trim(15,KEEP_PREFIX)
itemis ANALYZE URI Schema Copy link to clipboard
Since every artifact in itemis ANALYZE that belongs to a configuration is uniquely identifiable by its type, resource, and position relative to the resource, for each artifact a unique URI is created that points to an artifact.
On the first start of itemis ANALYZE, you are asked to register the ‚itemisanalyze’ scheme with your operating system. This allows to open artifacts in their source tool by handling the ‚itemisanalyze’ link. If you have installed itemis ANALYZE using the installer, the registration is already handled by the installer.
Whenever you open a itemisanalyze link an instance of itemis ANALYZE is started and the corresponding artifact is opened in the original tool. This allows you to easily share artifacts via chat or email when you need consultation or want to share your knowledge.
Obviously, this is restricted by the fact that the user of the link also needs a itemis ANALYZE installation and access to the artifact in question.
In order to create a itemisanalyze link right-click any artifact and select ‘copy ANALYZE link to clipboard’ from the context menu and paste it wherever you need it.
Links and link types Copy link to clipboard
ANALYZE’s principal task is to maintain links between artifacts. However, that does not mean that you can link any two artifacts on the spur of the moment. Instead you first have to ponder which artifacts types you want to link to each other and specify that by way of a link type. Given a link type specifying two artifact types A and B, you can create links connecting artifacts of type A and artifacts of type B.
Example
Let’s say you want to be able to link Java source code artifacts to their corresponding test results. To do so, first create an artifact type for the Java source code artifacts and give it a name, say, Implementation Java. Additionally, create another artifact type describing test result artifacts and call it Test Result. After that, create a link type for trace links from Implementation Java artifacts to Test Result artifacts. Using this link type, you then create links from Java source artifacts to their respective test results, either automatically or by hand.
Attributes of links Copy link to clipboard
A link establishes a relationship between two artifacts. It has the following attributes:
- link type: The link type constrains the types of artifacts link ends A and B can reference. See sections "Standard attributes of link types" and "Custom attributes of link types" for more information.
- source: In order to maintain links they have to be stored somewhere. The source identifies that location. A link source could be a ANALYZE file, an IBM DOORS module, an Excel spreadsheet, etc.
- position: A link source can hold a multitude of links. The position uniquely identifies a certain link. The position’s semantics highly depends on the source type. For example, the position of a link in an Enterprise Architect model is its UUID, while in a ANALYZE file it is its XMI ID.
- end A, end B: References to the two artifacts the link connects are maintained in the properties end A and end B. The types of these artifacts must match the artifact types specified by the link type. The artifacts themselves are uniquely identified by their respective artifact properties name, position, type, and source. (Please note that link types also have properties called end A and end B. However, they denote artifact types, not artifacts.)
- version A, version B: When a link is created, both artifacts A and B exist in a certain version at that point in time. The link can store version identifiers for A and B. However, an artifact can change over time, and it generally does not track such changes. That’s where the concept of a „version” comes in. It identifies a certain state of an artifact or relates it to a certain point in time. Please note: The version attribute is not necessarily set, but this depends of the link type configuration.
Standard attributes of link types Copy link to clipboard
A link between two artifacts must always derive from a link type. A link type defines the artifact types whose artifacts can be linked.
Link types have the following standard properties:
- End A, end B: These properties specify the artifact types of the artifacts that links of this link type are able to connect. (Please note that links also have properties called end A and end B. However, they denote artifacts, not artifact types.)
- Role A, role B: These optional textual descriptions can describe the semantic meaning of the A and B artifacts. They can be used in custom queries.
- Classification: The classification is an optional name, textual description, etc. of the link type as such. The classification does not need to be unique, i.e., different link types may have the same classification. It can be used in custom queries.
Custom attributes of link types Copy link to clipboard
In addition to standard properties, a link type can also have custom attributes. A custom attribute’s value is the result of evaluating a function which typically takes the contents of the linked artifacts into account, extracts portions of them, possibly transforms them, combines them, and maps everything into the function’s result value. For example, a custom attribute approval_status could comprise the author’s name and last modification date of some document (artifact A) plus status and name of the person writing a review (artifact B).
Custom attribute values are evaluated when a link is created or edited. The values are then persisted within the link. This makes it possible to detect certain changes to the underlying artifacts. Consider the example above: If the last-modified date of artifact A changes, a suspicious links validation would re-evaluate the approval_status' value and detect that there’s a difference from the value that was formerly stored in the link.
The mappings creating custom attributes are the same for all links of a given type, so the custom attributes are defined on the link type level. Section "Configuring a link type" explains how you can create such mappings.
Link sources and link providers Copy link to clipboard
A link is stored in a link source, for example in a ANALYZE file, in an IBM DOORS module, in an Excel spreadsheet, etc.
A link provider is a software component that actually makes links available. It fetches them from a link source, retrieves the referenced artifacts from their respective sources, and evaluates the mappings to create the custom attributes defined in the link type.
Links pertaining to a single link type can be distributed over several link providers and their associated link sources.
For example, consider different individuals working on links of the same link type, but on different subsets of links. Each person could maintain his or her own link provider and source.
In another scenario, certain links of a given link type are coming from PTC Integrity. However, it is not possible to store links „from the outside” to PTC Integrity. A possible solution is to create an additional link source, say, a ANALYZE file, and configure an appropriate link provider.
Configuring a link type Copy link to clipboard
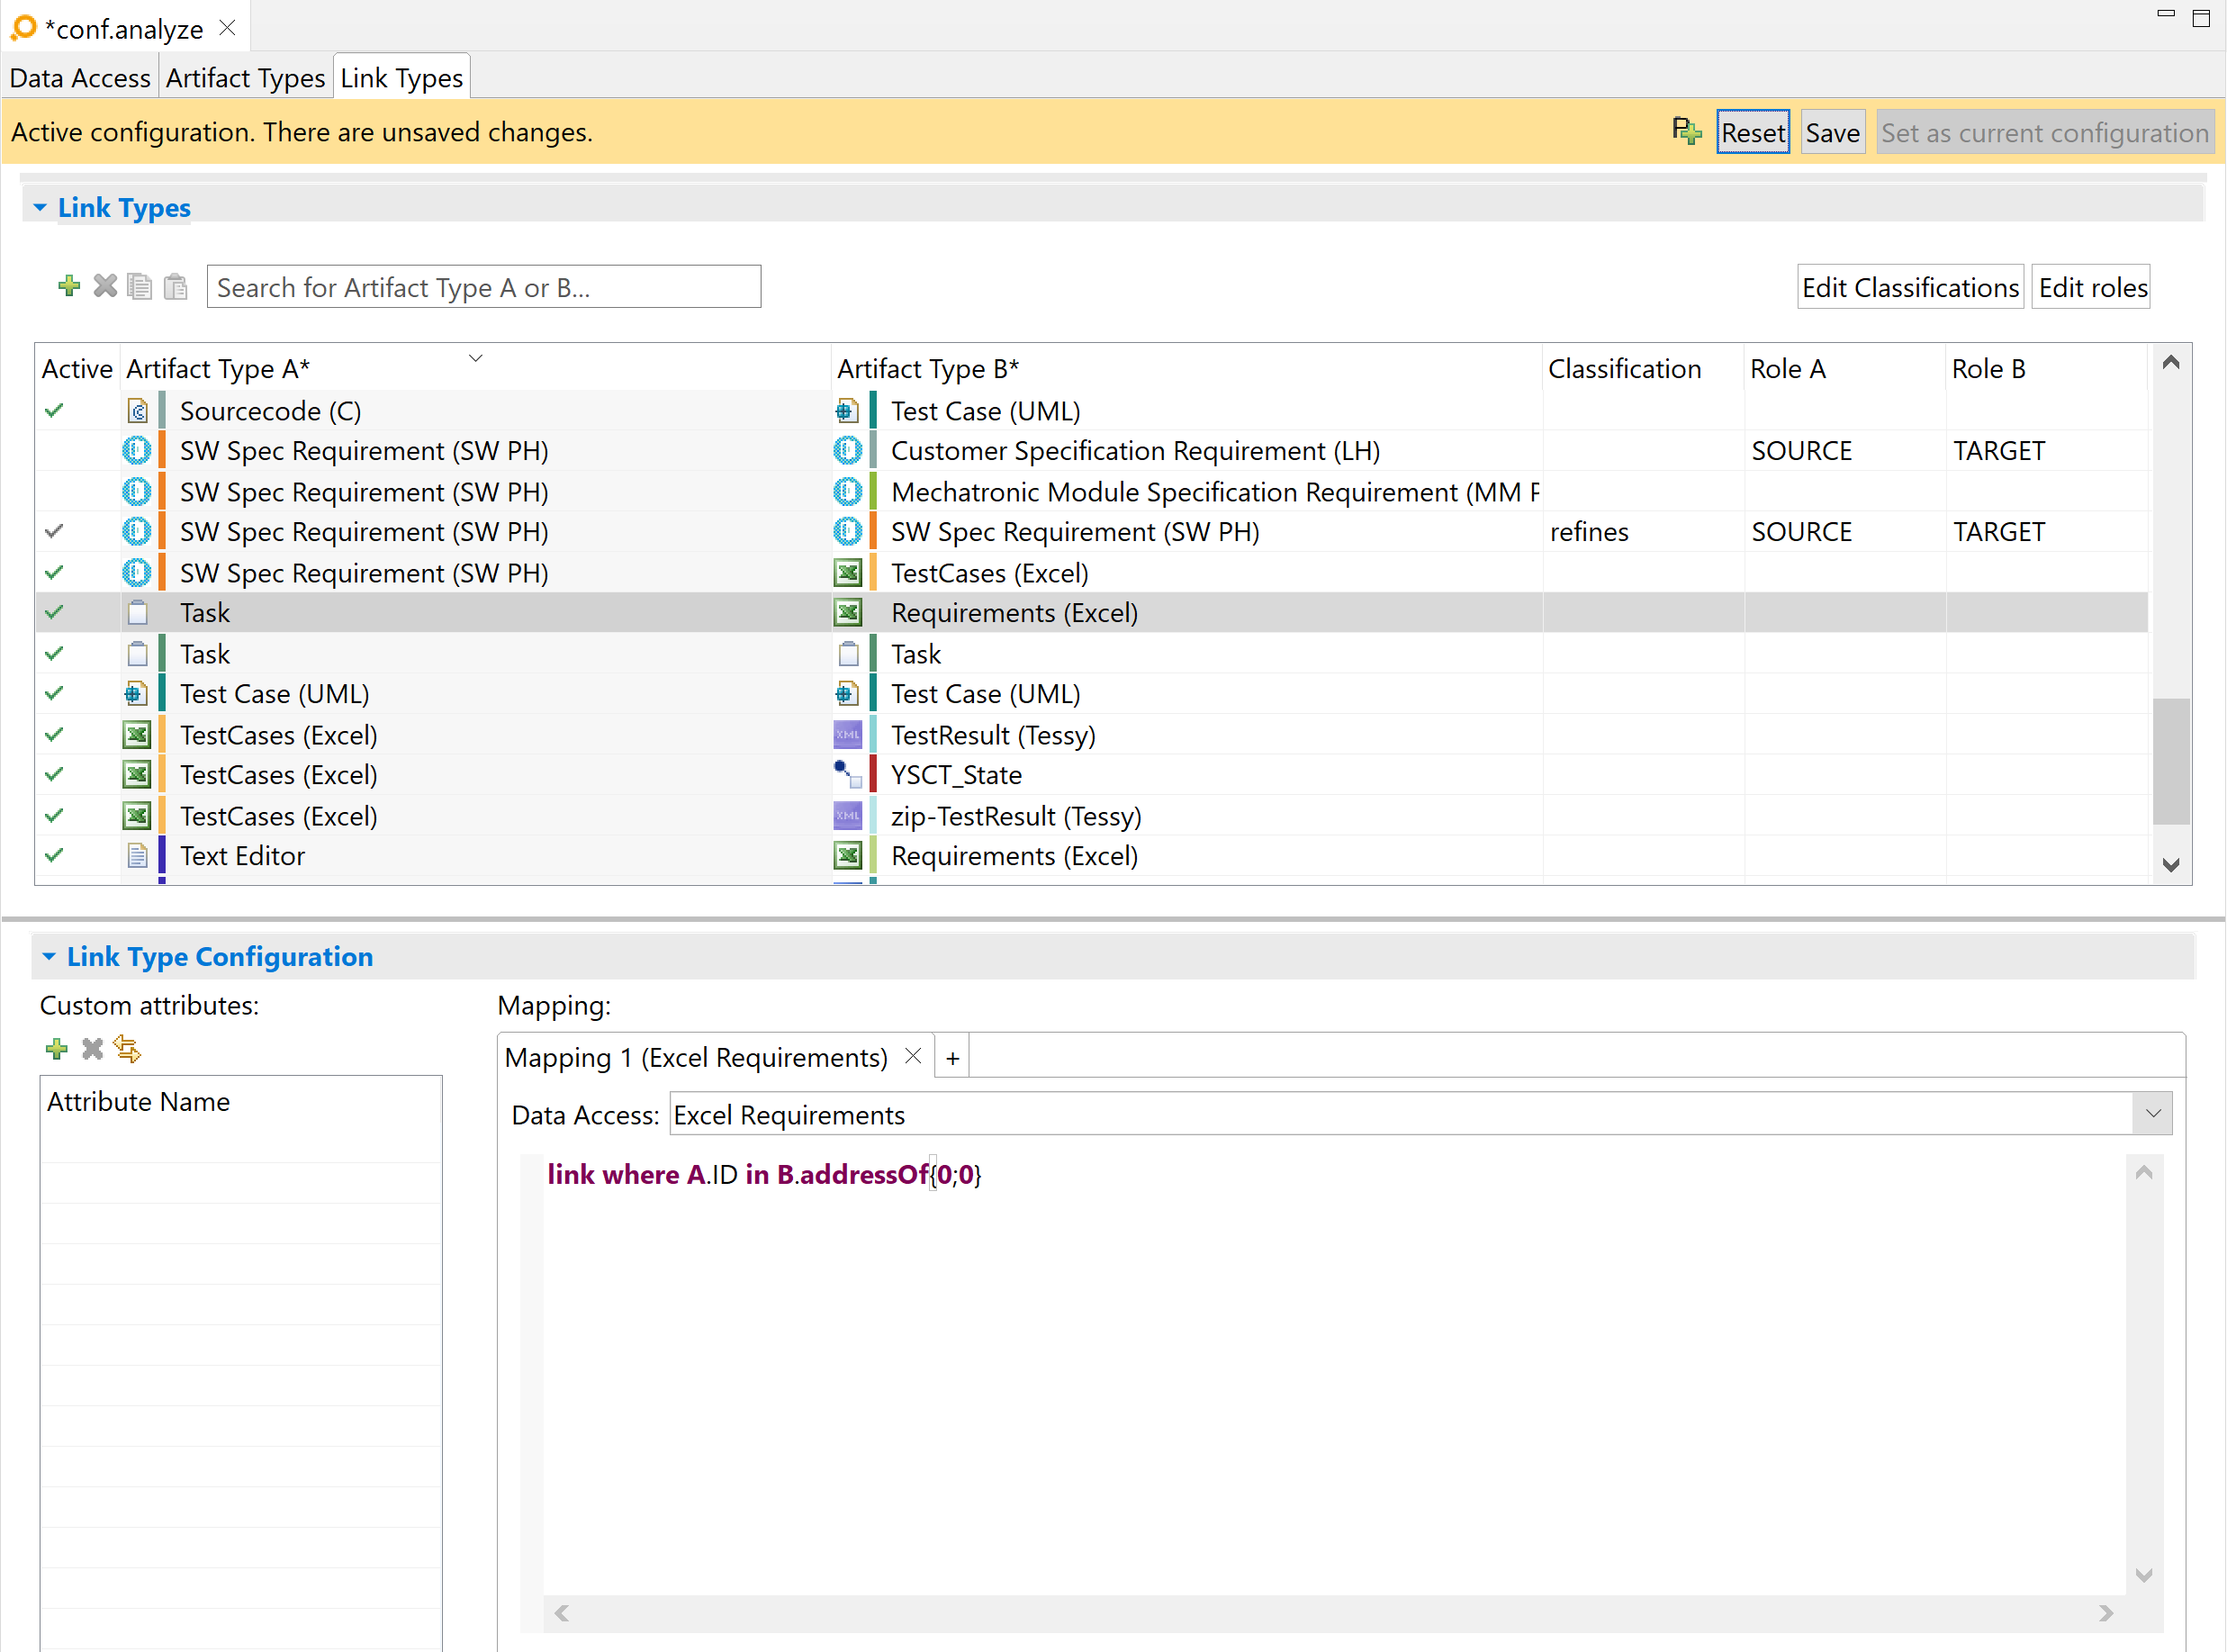
In the
Link types tab, you can configure which artifact types can be linked to each other in ANALYZE. To do so, please click on the
icon. The
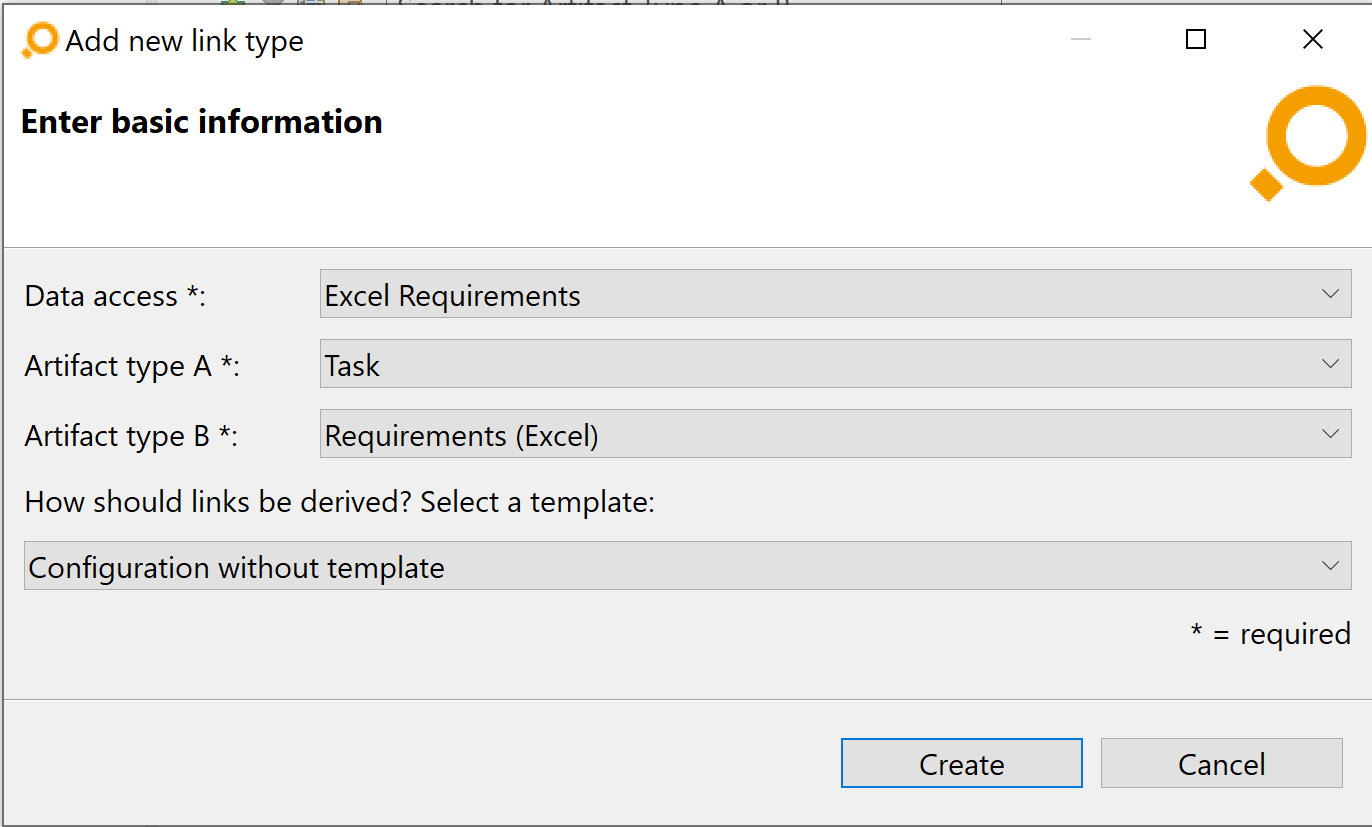
Add new link type dialog will appear where you have to select the following items:
- In the Data access drop-down menu, select the data access where to maintain links of this type, i.e., derive existing links from and store new links to. If the name of a data access is followed by „(No License)”, this means that there is currently no license available for the corresponding adapter.
- In the Artifact type A and Artifact type B drop-down menus, select the involved artifact types, i.e., the types of the artifacts which are going to be link ends.
- Optionally select a mapping configuration template from the corresponding drop-down menu.
Click on the Create button to add the new link type to the list of link types.
In the list of link types, you can optionally define per link type:
- a classification
- artifact roles
In the Link Type Configuration area at the bottom of the tab, you can create mappings for the link type selected in the Link Types table. Each mapping defines a way to derive links of the given link type. For each mapping, you can define the data access from which to derive links. The value <implicit> assigns no data access.
You can optionally configure the mapping by using a textual configuration language that is specific to links of the selected data access. You can edit the mappings in the detail area in the tabs under the Mapping caption in the detail area. Alternatively, you can edit each mapping in a separate dialog that opens when you double-click the title of the tab. You can open several of these dialogs at the same time.
Depending on the language, you might be able to refer to custom attributes of the link type. You can configure the list of custom attributes on the left side of the details area.
The Active column in the Link Types table shows whether any mappings are active for the respective link type. This depends on the activation status of the referenced data access: If it is not active, the corresponding mappings of the link type will also not be available. The Active column for a link type shows a green check mark if all mappings of the link type are active. If no mapping is active it shows no check mark. In all other cases, i.e., at least one mapping is inactive and at least one mapping is active, it shows a grey check mark.
Section "Connecting itemis ANALYZE to various tools" describes the configuration of specific link types associated with their respective adapter.
Assigning a link classification
Link classifications can be configured to make the meaning of links more clear. A sample classification is „refines”, shown in the second screenshot below. You can assign a classification to a link type by selecting it from the Classification drop-down menu in the Link Types table.
The elements shown in this drop-down list are individually configurable. If you wish to add classifications, click on the Edit Classifications button above the table in the Link Types tab. If no classification exists yet, the Add new classification dialog opens, asks for a new classification name, and then you should proceed as described below.

If any classifications exist already – and if it is the just-added first one only – the Edit Classifications dialog lets you add, edit and remove classifications.

Assigning artifact roles
In order to make the meaning of artifacts more clear if they get linked, artifact roles can be configured. You can assign a role for both artifact types, respectively, that are involved in a link type. Roles can be selected via drop-down menus in the Role A column and the Role B column.
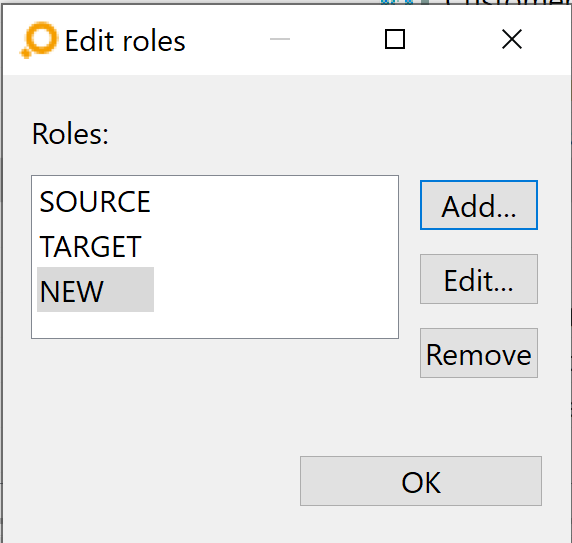
The elements shown in this drop-down list are individually configurable. If you wish to add roles, click on the Edit Roles button above the table in the Link Types tab. If no role exists yet, the Add new role dialog opens, asks for a new role name, and then you should proceed as described below.
If you wish to add new roles press the button „Edit roles” above the table. If no role exists a simple dialog opens where you can add a new role after entering its name.
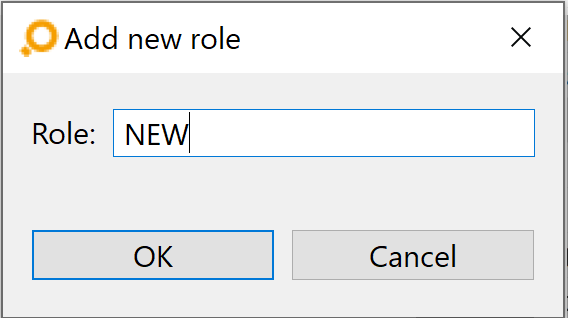
If any roles exist already – and if it is the just-added first one only – the Edit Roles dialog lets you add, edit and remove roles.
Configuring custom attributes for link types
Some link types are supporting the mapping of custom attributes to values defined in the textual configuration of the link type.
To create such a mapping, define custom attributes in the Link Type Configuration area of the Link Types tab. There are two ways to create them:
- Manually create a new attribute via the
icon below the
Custom attributes label. In the
Mapping area you can reference the added custom attribute.
- Alternatively, reference non-existing attributes in the
Mapping area as if they existed. Then click on the
icon below the
Custom attributes label. All mapped attributes that are not yet contained in the custom attributes list will be added to it.
Configuration parameters Copy link to clipboard
Sometimes it is necessary to maintain traceability for different variants or versions of the same project. To support this use case, itemis ANALYZE allows users to define parameters that can be referenced in the configuration language of most adapters. Instead of maintaining different versions of an otherwise identical configuration, you can create one parameterized configuration and then switch between different parameter values.
Imagine you want to re-use the same configuration with only slight adjustments, e.g., analyze the traceability of your project for different releases with associated release numbers.
In such cases, the release number has to be configured for several data accesses, artifact types or link types. Now you don’t want to adjust the release number in all these definitions individually, which would be ather tedious and error-prone. Instead, you can introduce the release number as a parameter. It will have to be adjusted only once, and then its new value will be applied everywhere the parameter is used.

Each occurrence of the parameter reference $cellName is replaced by the actual value of the _cellName parameter, here „n/a: n/a”.
Creating and configuring parameters Copy link to clipboard

The Parameters tab in the ANALYZE Configuration editor
The parameter configuration is considered an advanced feature that might not be relevant for every user. Therefore, by default, the
Parameters tab is hidden. However, it can be activated easily by a click on the
 icon in the status bar of the configuration editor.
In order to create a new parameter, open the
parameters tab, click on the
icon in the upper left corner, and enter the name of the parameter. To add new parameter values, click on the
icon in the lower half of the tab. Deletion of parameters and their values works in the same way as for configuration elements in the other tabs. Parameters can be copied and pasted within and across ANALYZE configurations.
You can select the active value of a parameter from the drop-down list in its Active value column. You may only select values that you defined previously. This is to prevent typos when switching back-and-forth between parameter values. When you add the first value for a parameter, it will automatically be selected as the active value.
A parameter’s cell in the Referenced column contains a green checkmark if that parameter is referenced in any configuration text for a data access, a link type mapping, or an artifact type mapping. If you place the mouse cursor over this checkmark, a message box appears that lists the data accesses, artifact types, or link types which reference the parameter.
For using different parameter sets, it’s possible to export the current values into a properties file. The file can be used in Batch Mode or imported into a configuration again. While importing parameters or values which are not yet defined in the configuration can be added.
Referencing configured parameters in the configuration Copy link to clipboard

Referencing parameters in ANALYZE Configuration
You can reference a parameter in a configuration by prepending a
$ (dollar sign) left from its name. For instance, you can reference a parameter with the name
parametername by writing
$parametername.
Parameters are supported in all cases where you can create complex strings by concatenating substrings using the
+ operator. Most ANALYZE configuration languages are also supporting parameters in other cases. You can use them as replacements for concrete strings, e.g., in comparisons. Wherever parameters are supported, ANALYZE will offer them to you, if you trigger content assist by pressing
[Ctrl] + [Space].
Parameter references in a configuration are highlighted in a different font style and color to distinguish them from the rest of the configuration text. If you place the mouse cursor over them, you can see their currently selected value. You can also see a parameter’s current value if you select it in the list of suggestions, which you get by triggering content assist.