Table of contents
The Simulation view Copy link to clipboard
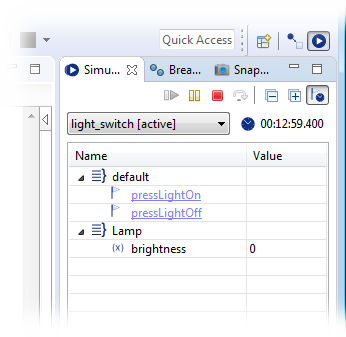
The Simulation view is used to manually raise events and to inspect and modify variables of a running simulation. By default, that view is located on the right-hand side of the SC Simulation perspective, see figure "Simulation view" for an example.
The Simulation view groups events and variables by their interfaces. The unnamed interface appears as default in the interface list. Click on the small triangle left from an interface’s name to show or hide that interface’s contents, i.e., events and variables.
The simulation view also displays
time events, provided the statechart uses time constructs like
after or
every. Press or release the
"show time events" button
 to toggle between displaying and not displaying time events. You can click on a time event to raise it, i.e., you don’t have to wait for 24 hours to elapse in real time until the
"after 24 * 60 * 60 s" transition fires.
You can have multiple simulation instances running at the same time. They may simulate the same or different statecharts. Use the simulation view’s drop-down menu to switch between simulation instances.
A digital clock right from the drop-down menu displays the virtual time elapsed in the simulation. It pauses while the simulation is suspended.

The Simulation view
Please note:
Depending on your screen resolution and font size settings, you might not be able to spot the Simulation view by its name, because the tab containing it is quite narrow and might not provide enough space for displaying the title. Hover over the tabs to reveal their respective titles in a pop-up window.
Figure "The SC Simulation perspective" is demonstrating this: The user has hovered the mouse pointer over a tab that just displays the first letters of its title. However, a pop-up window right under the pointer shows the tab’s full title “Simulation”.
Controlling a simulation Copy link to clipboard
- To terminate the simulation, click on the
Terminate button
 .
.
- To suspend the simulation, click on the
Suspend button
 .
.
- To resume a suspended simulation, click on the
Resume button
 .
.
- Use the
Step Over button
 to execute a single run-to-completion step.
- To terminate the current simulation and run it again from the start, use the
Terminate and Relaunch button
 .
.
- To start a new simulation while keeping the current one active, use the
Restart button
 .
.
Interacting with a simulation Copy link to clipboard
You can interact with a running simulation by manually raising events and by inspecting and modifying variables. You can do so at any point in time, but in most cases you will do it while the simulation “sits idle” at its active state and waits for an event to trigger a transition.
Raising an event in the simulation Copy link to clipboard
To raise an event, proceed as follows:
- In the simulation view, click on the small triangle to open the interface containing the event, if needed.
- Click on the event to raise it for the next run-to-completion step.
If the simulated statechart’s execution semantic is
EventDriven then the simulation view will contain a global event called
triggerWithoutEvent. Clicking on it will call the statechart’s
triggerWithoutEvent operation and with that it will perform a run-to-completion step without raising any event.
Inspecting a variable Copy link to clipboard
To inspect a variable’s value, proceed as follows:
- In the simulation view, click on the small triangle to open the interface containing the variable, if needed.
- The variables contained in the interface are displayed.
Watch the displayed values change as the simulation progresses and actions in states or transitions are executed that modify the variables' contents.
Modifying a variable Copy link to clipboard
To manually modify a variable’s value, proceed as follows:
- If needed, open the interface containing the variable by clicking on the small, hollow triangle left from the interface name in the simulation view.
- Click on the variable’s value. You can edit the value now.
- Enter the variable’s new value and press
[Enter]. The new value is assigned to the variable and replaces the former value.
 .
.
 .
.
 .
.
 to execute a single run-to-completion step.
 .
.
 .
.